#82: Nursery, Fertilizer & Irrigation (Jan/Feb 2025) 
New Introductions for Hawaiian Landscapes

By: David Fell
The first new introduction is a bromeliad in the genus of Alcantarea. Alcantarea glaziouana is a large to medium bromeliad with a maximum size of 4-6’ in diameter. It is a lithophytic plant naturally growing near sea level on rocky cliffs. The foliage is light green and coated with trichomes which appear gray. When the plant flowers, it produces a large well-branched inflorescence with a height up to 10’ above the plant! The flowers are snow white with a lovely, sweet floral fragrance that matures over several months. The inflorescence can last longer than 6 months!
The cultivar being introduced is Alcantarea glaziouana `Golden Boy’. This plant was discovered as a partially variegated seedling in a tray of seedlings. Over several years this unique seedling was cultivated until flowering. After flowering several fully variegated pups were obtained. These grew for a few more years until additional pups were obtained. Now there is a sufficient quantity of material to release into the trade. `Golden Boy’ is a variegated plant with rich yellow variegation on a gray-green leaf. This eye-catching and large plant is suitable as a focal point in any landscape. Viewed from above they have a pleasing geometric form. Growing requirements are full sun to partial shade, moderate watering (underwatering is better than over watering), and fertilizer in the landscape is not required unless additional growth is desired. Inadequate watering can lead to the browning of the leaf tips or entire lower leaves. No diseases have been noted.

Figure 1. Alcantarea glaziouana `Golden Boy’ top view.
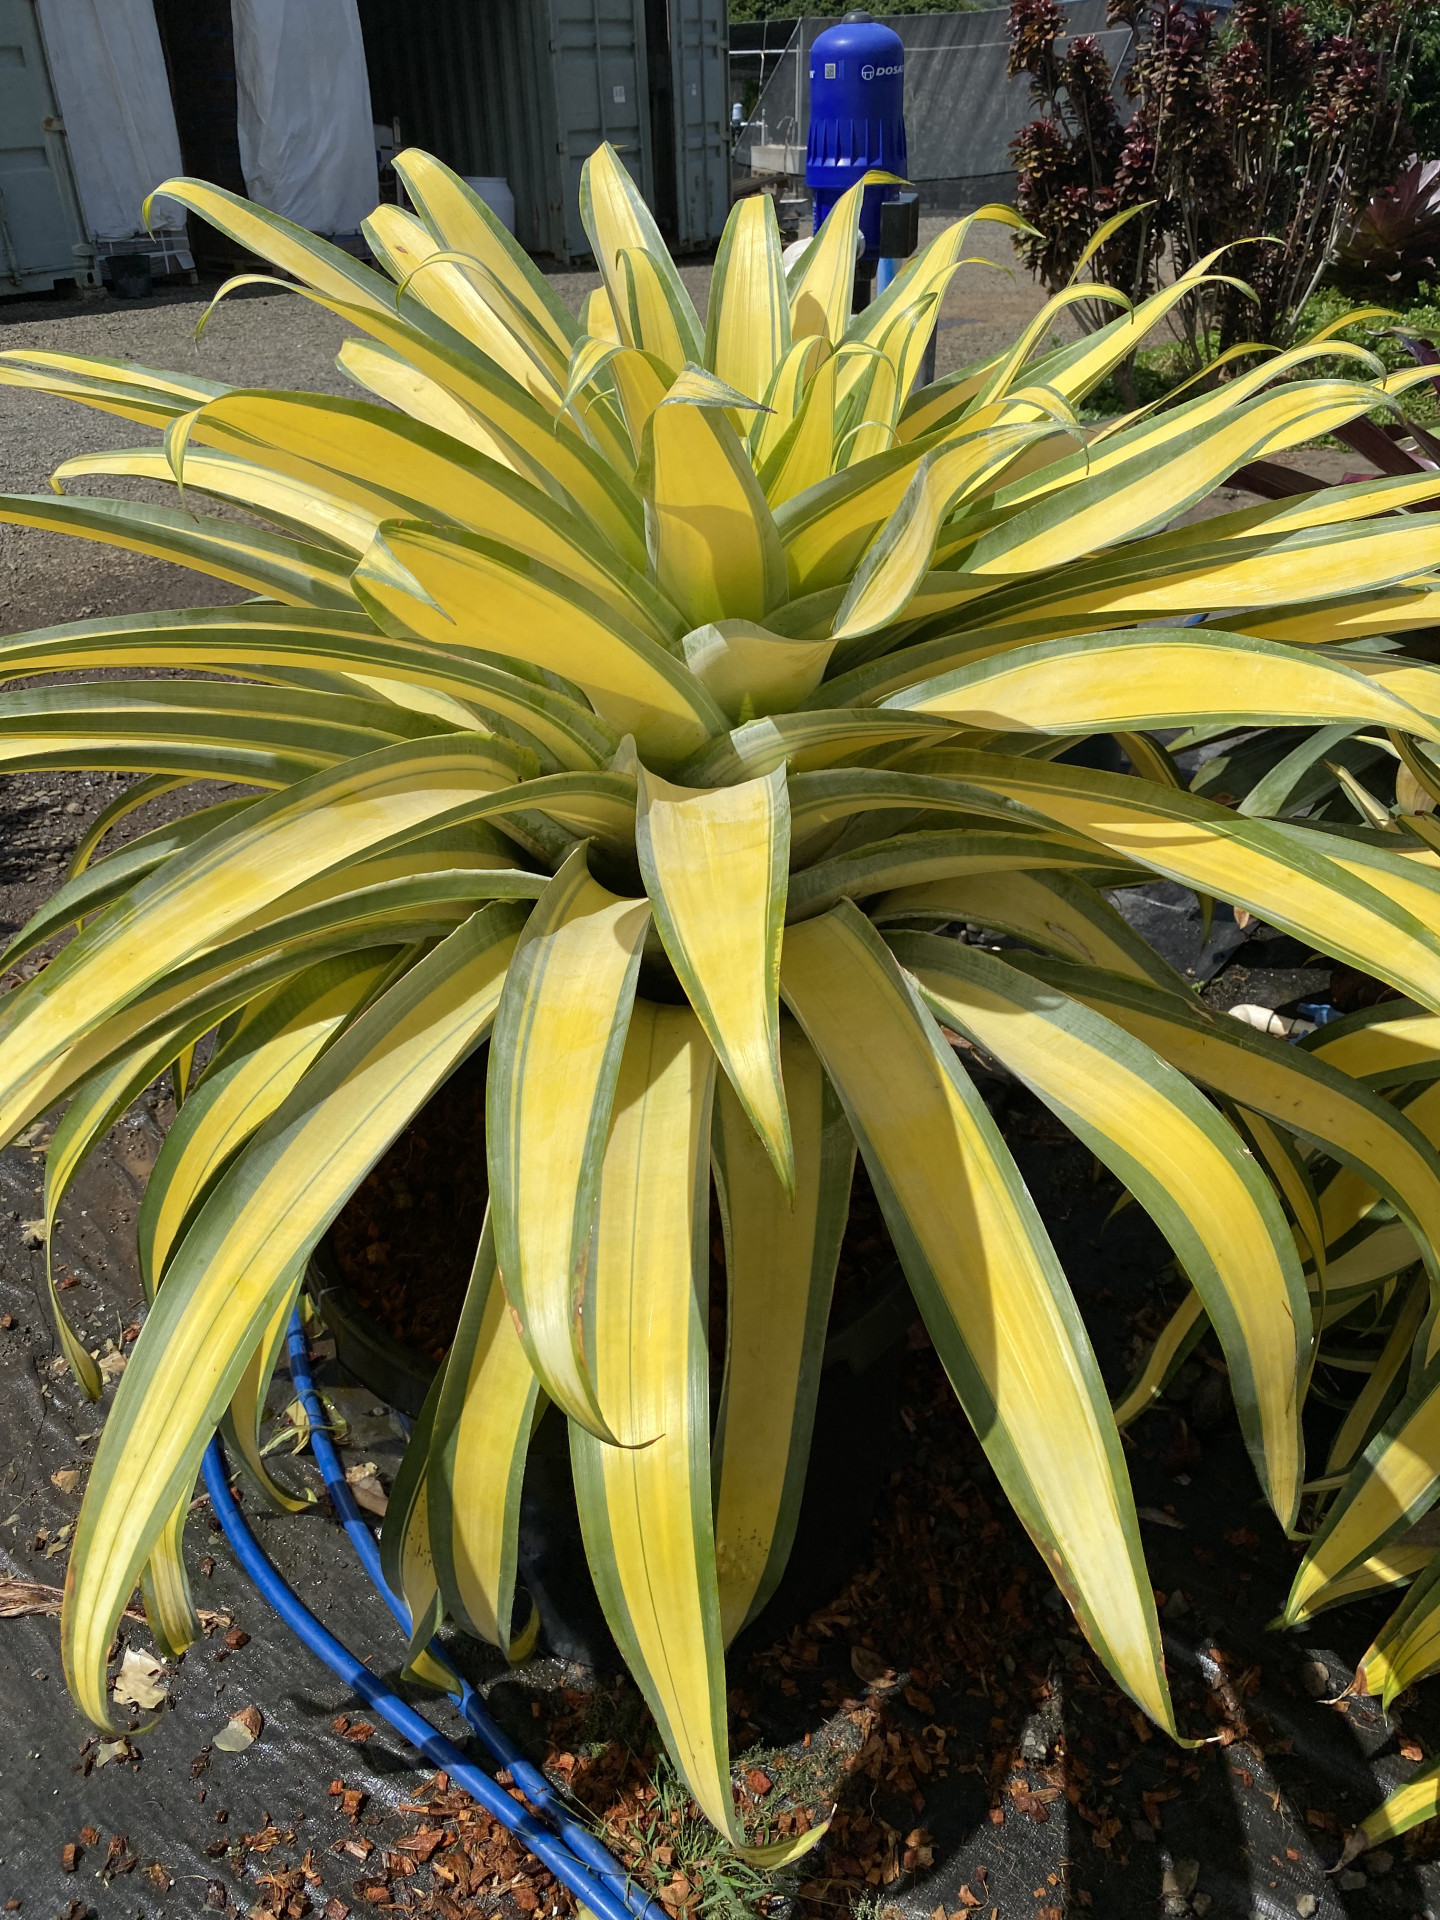
Figure 2. Alcantarea glaziouana `Golden Boy’ side view.
The next introduction is a Ficus sp. It is very similar to and probably related to Ficus sp. 'Green Island'. Both appear to be cultivars of Ficus macrocarpa. What sets this apart from Green Island Ficus is its smaller, glossy, cup-shaped leaves and its low growing habit. After several years of testing, it has only grown to a maximum height of about 18” tall. It is a reasonably fast-growing plant and will flow around rocks in the landscape. It is suitable for use as a ground cover where it is desirable to keep the height low. It can be trimmed and shaped to control the height and width. Trimming to keep it confined in a specific bed can be done easily with hand pruners. Growing requirements are full sun to shade (it does not stretch in 50% shade), and it is tolerant of a wide range of water regimes but will drop leaves with excessive under or over-watering. No specific fertilizer has been tested but 14-14-14 Nutricote has been used in potted production with good results. No diseases have been noted.
The following 2 pictures will give an idea of the speed of growth. The first photo was taken in May of 2024 and the second was taken in December 2024.
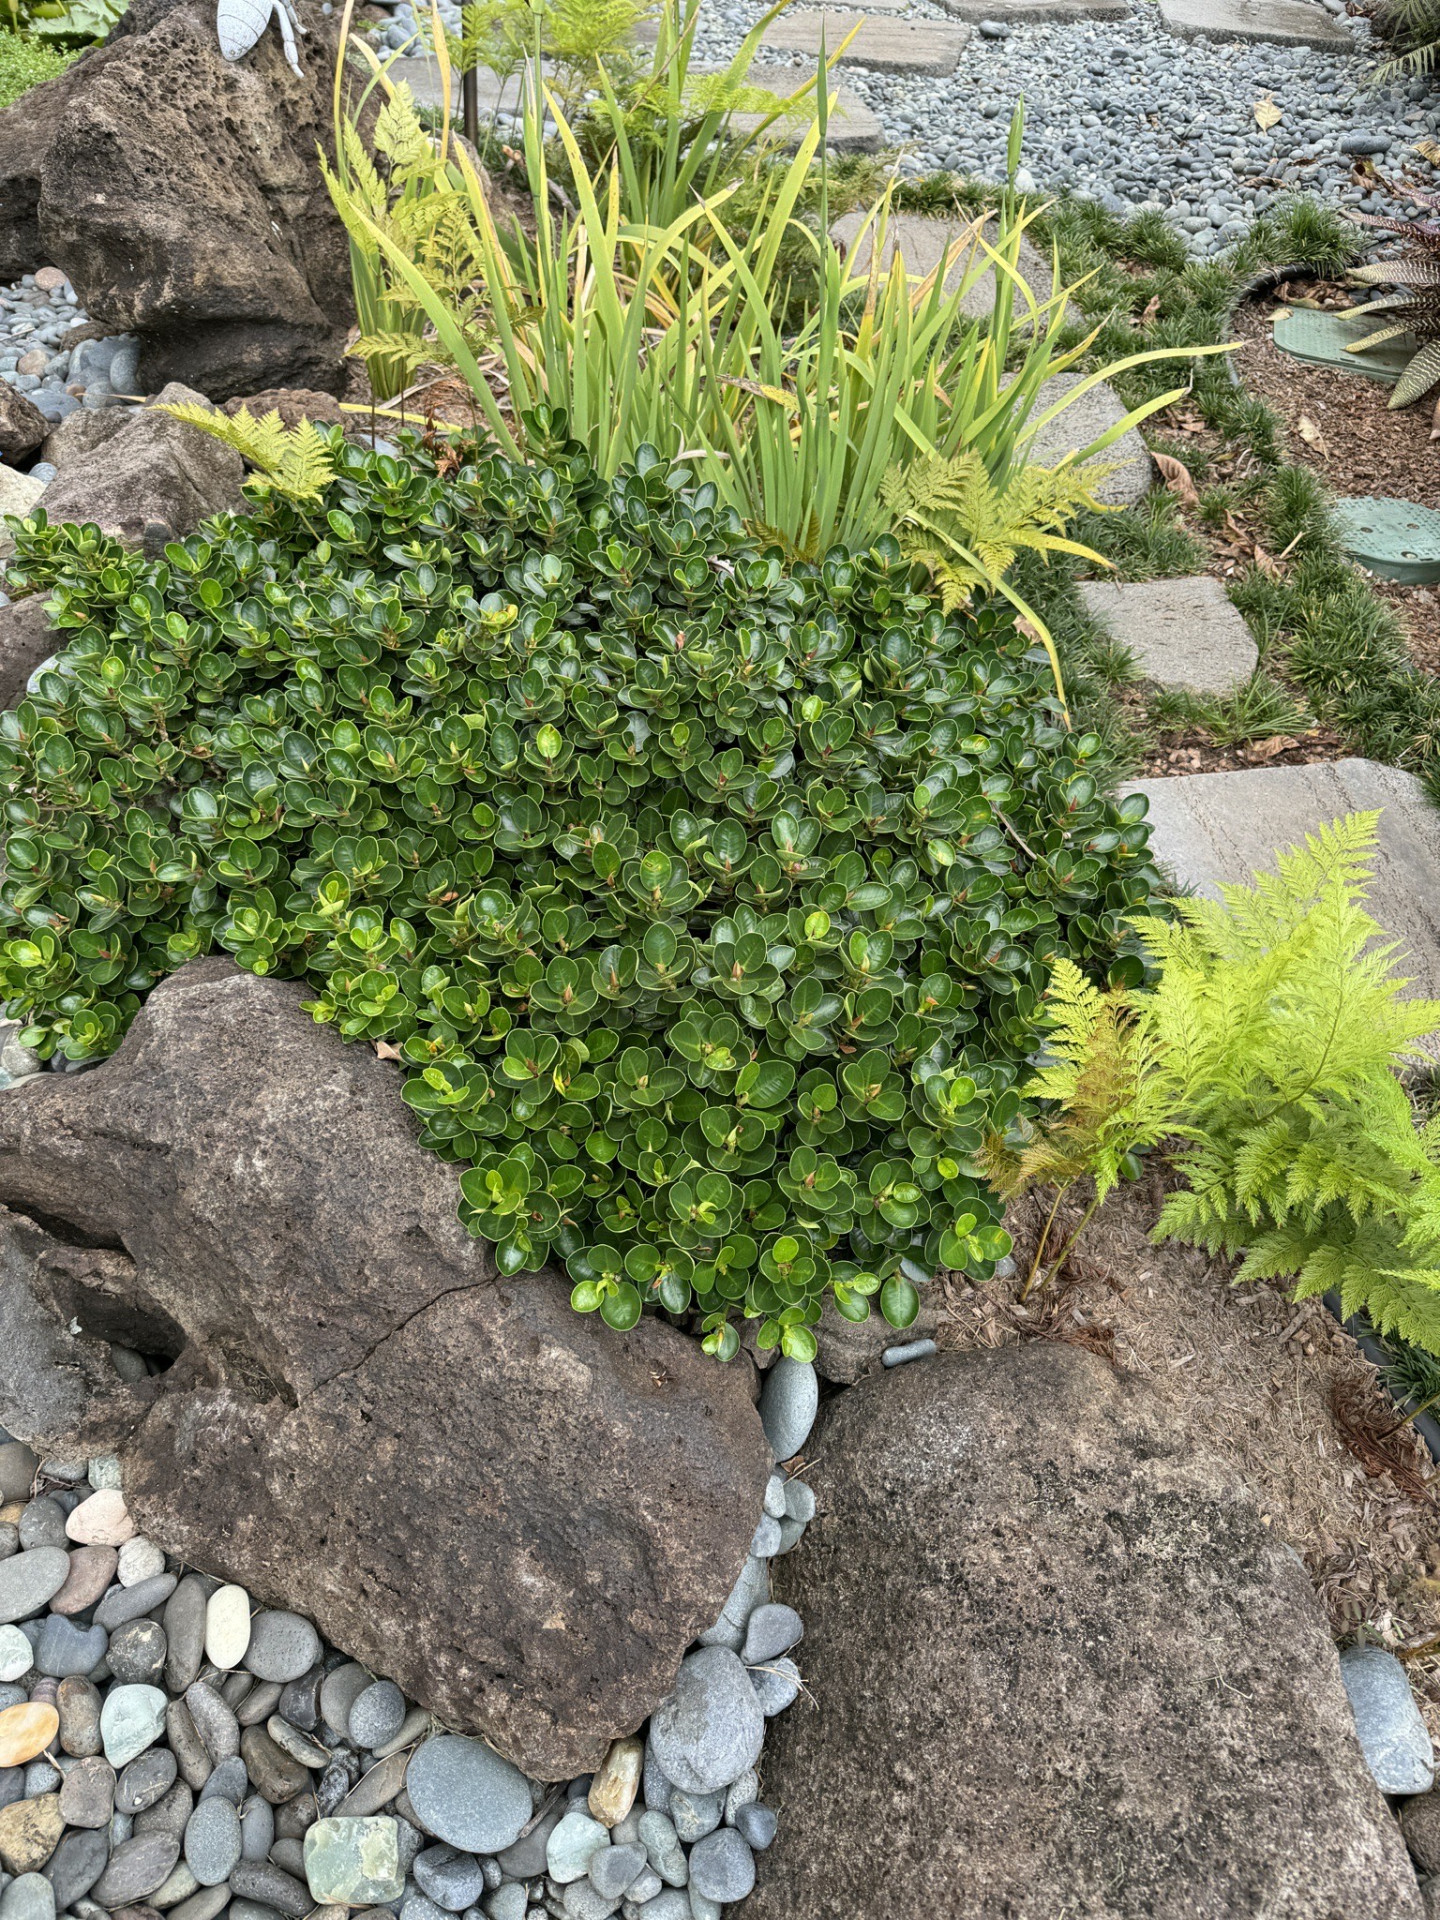
Figure 3. Ficus sp. photo taken in May 2024.
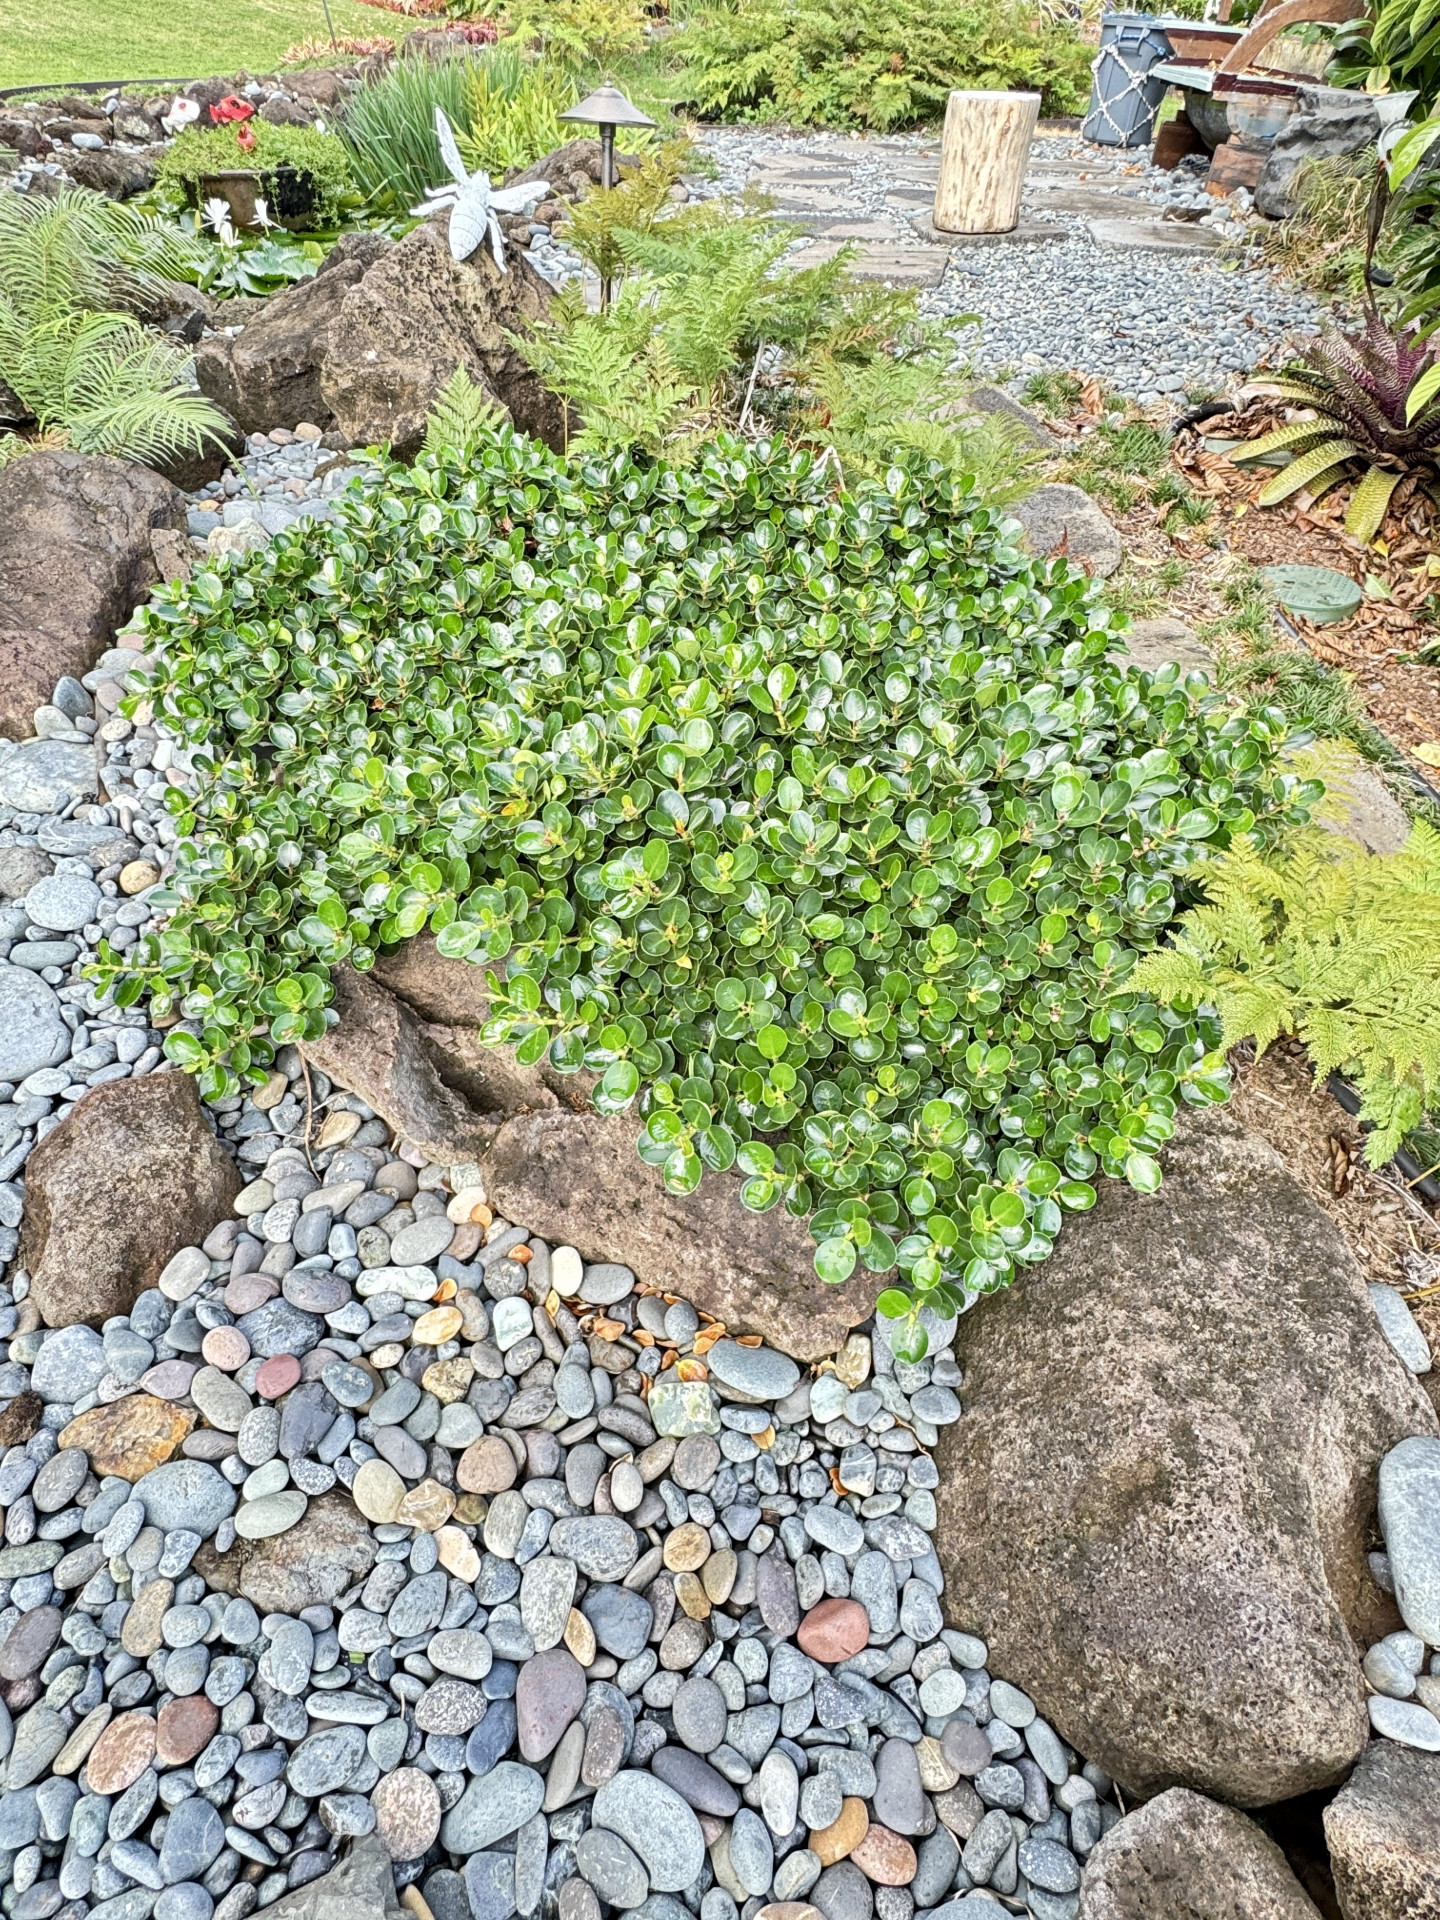
Figure 4. Ficus sp. photo taken in December 2024. The plant size is approximately 4-5 feet in diameter with an estimated age of 2-4 years from planting from a single 6” pot.
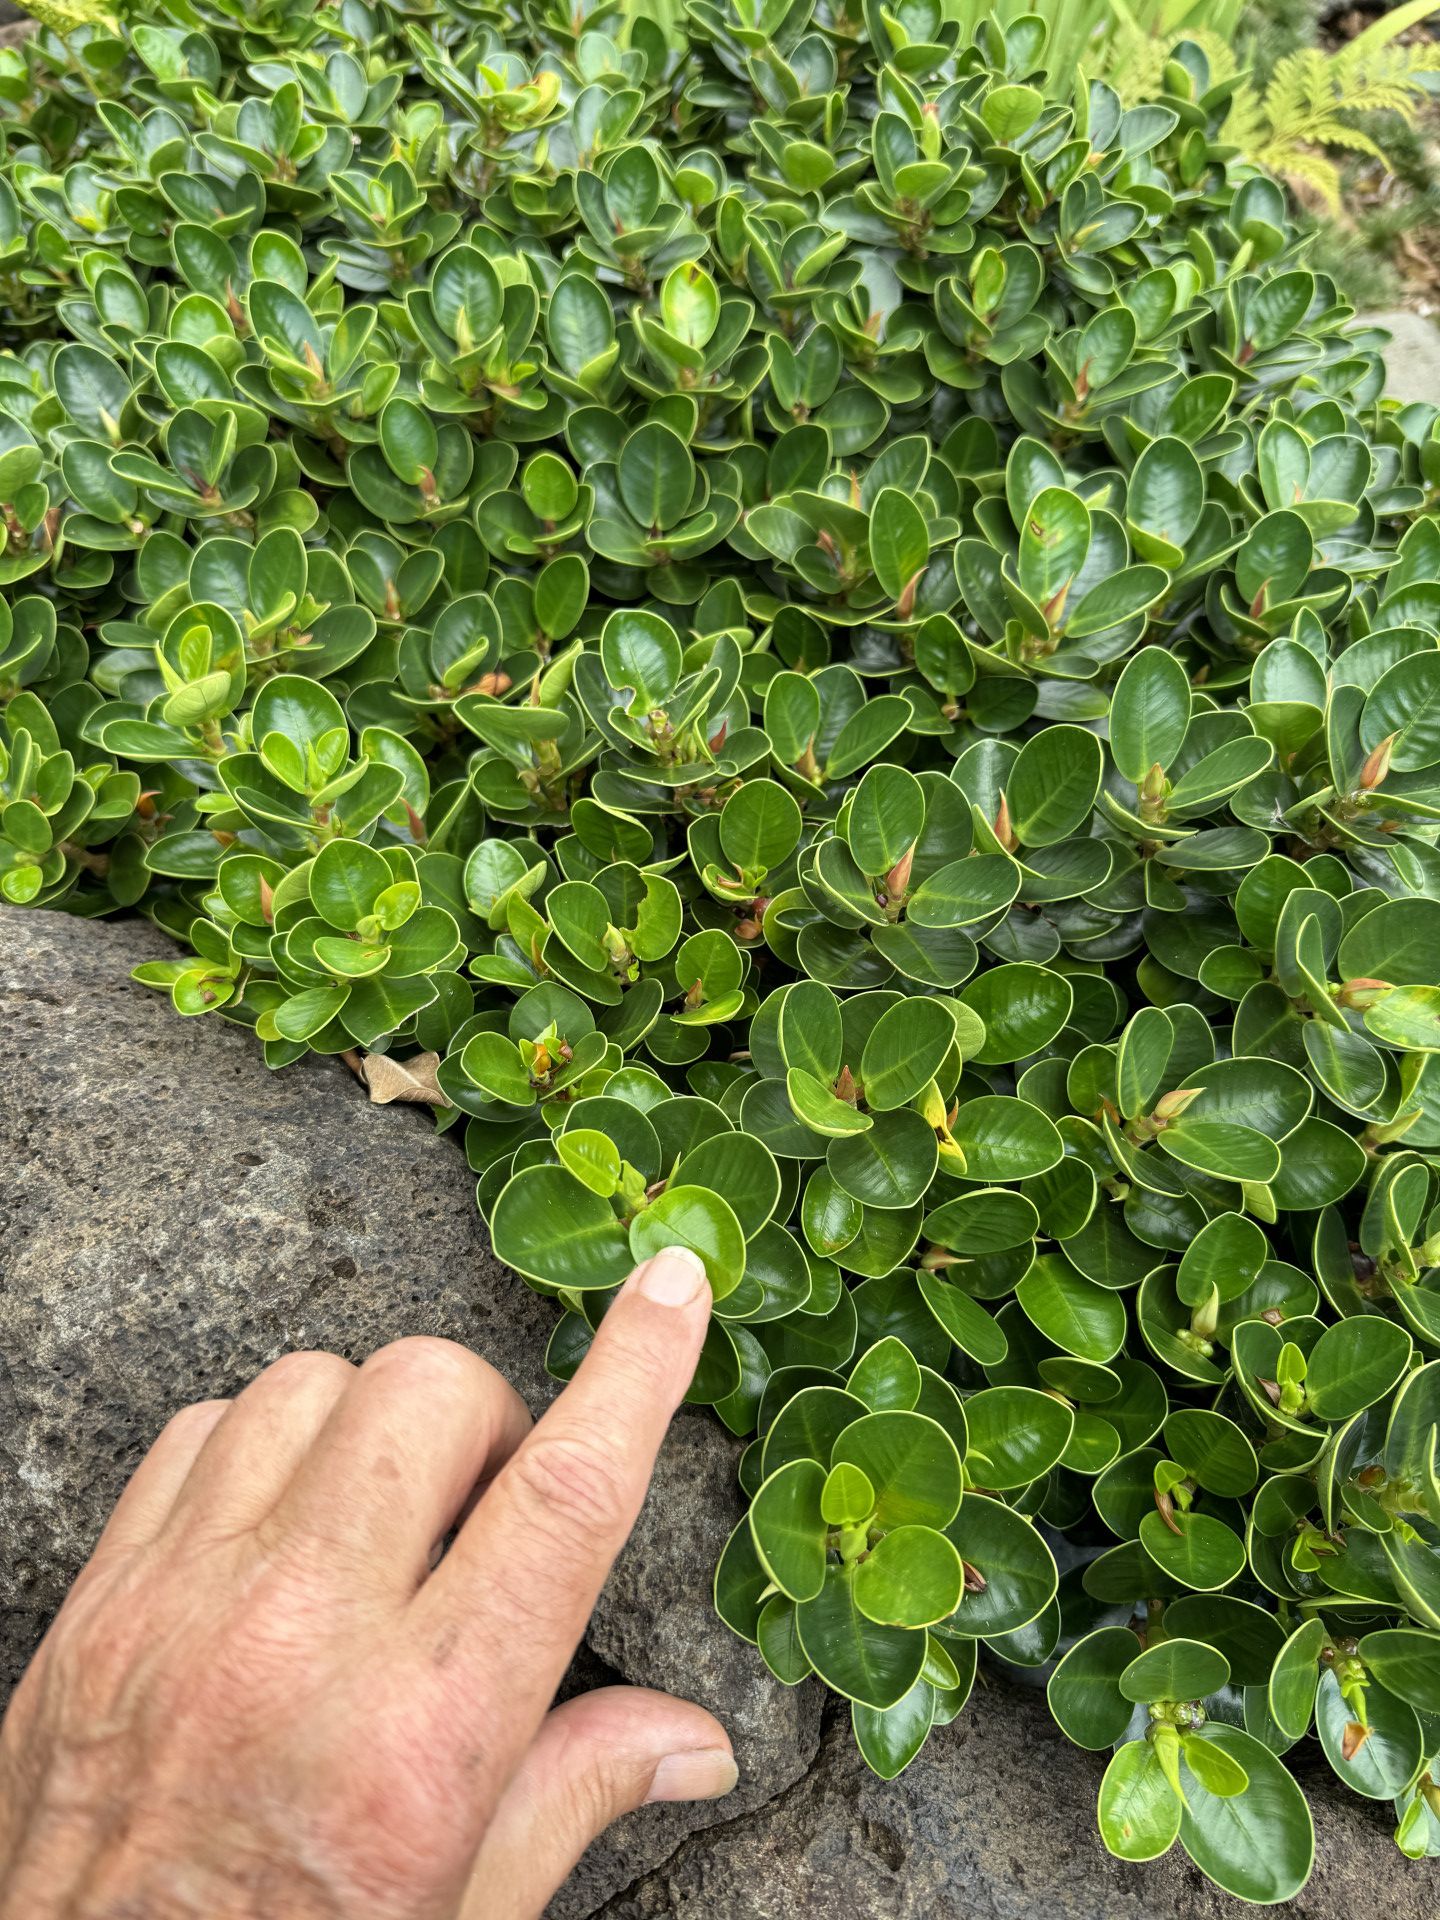
Figure 4. Ficus sp. growth without fertilizer.
David Fell,
Unknown Distribution and Threat of Sea Grape Rust (Uredo uviferae) in Hawaii
By: Kimi Kawasaki and Josiah Marquez
Introduction
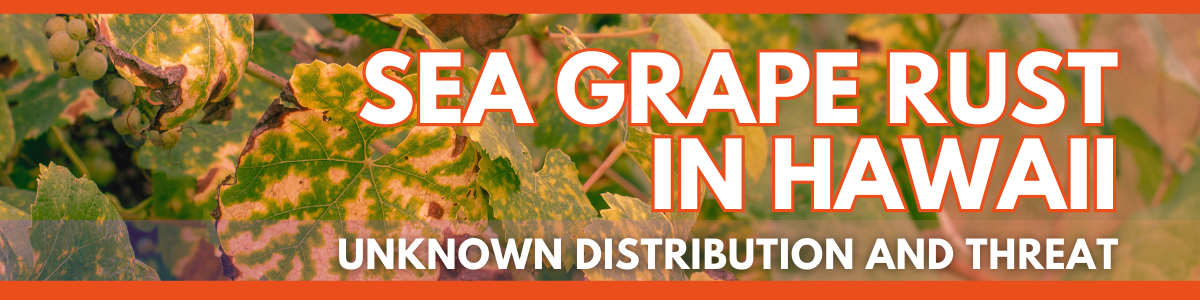
The Sea Grape tree (Coccoloba uvifera; Fig. 1) is a popular ornamental along Hawaii’s shoreline as a coastal windbreak hedge (Little and Skolmen, 1989) because of its ability to withstand salt, drought, and windy conditions, stabilizing coastal soils (Gilman and Watson, 1993, Ono, 2020). As the common name implies, these trees produce drooping grapelike fruit clusters that ripen to a purple color (Fig. 2 and 3). These edible fruits are made into jelly and wine in tropical America (Little and Skolmen, 1989). They are known to be hardy plants with few diseases and pests. However, there is a pathogen that infects Sea Grape, Uredo uviferae, also known as the sea grape rust.
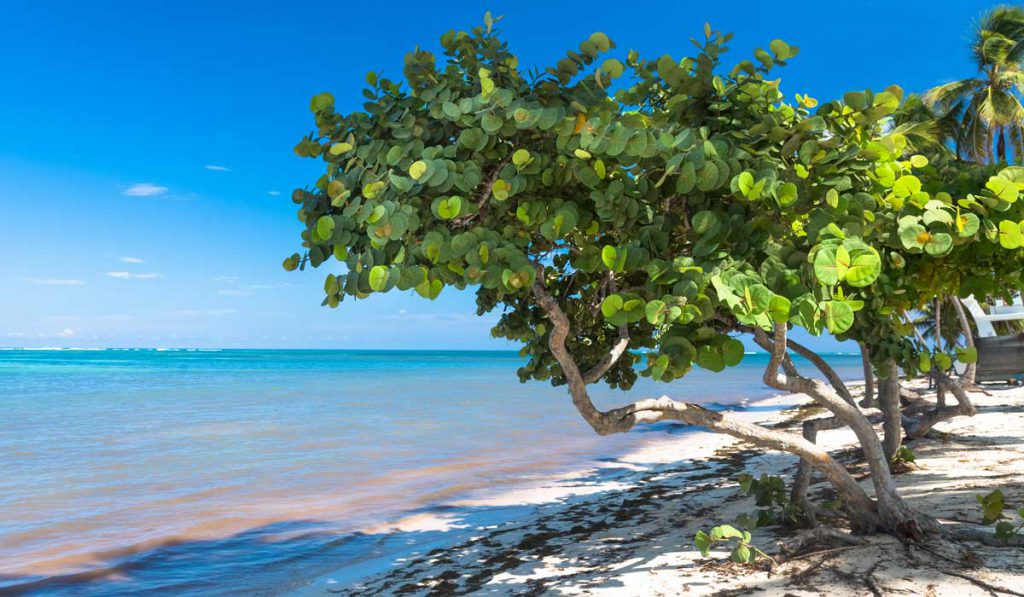
Figure 1. Sea grape tree growing along the shoreline. Photo Credit: https://delraybeachhistory.org/blog/our-native-sea-grape/.
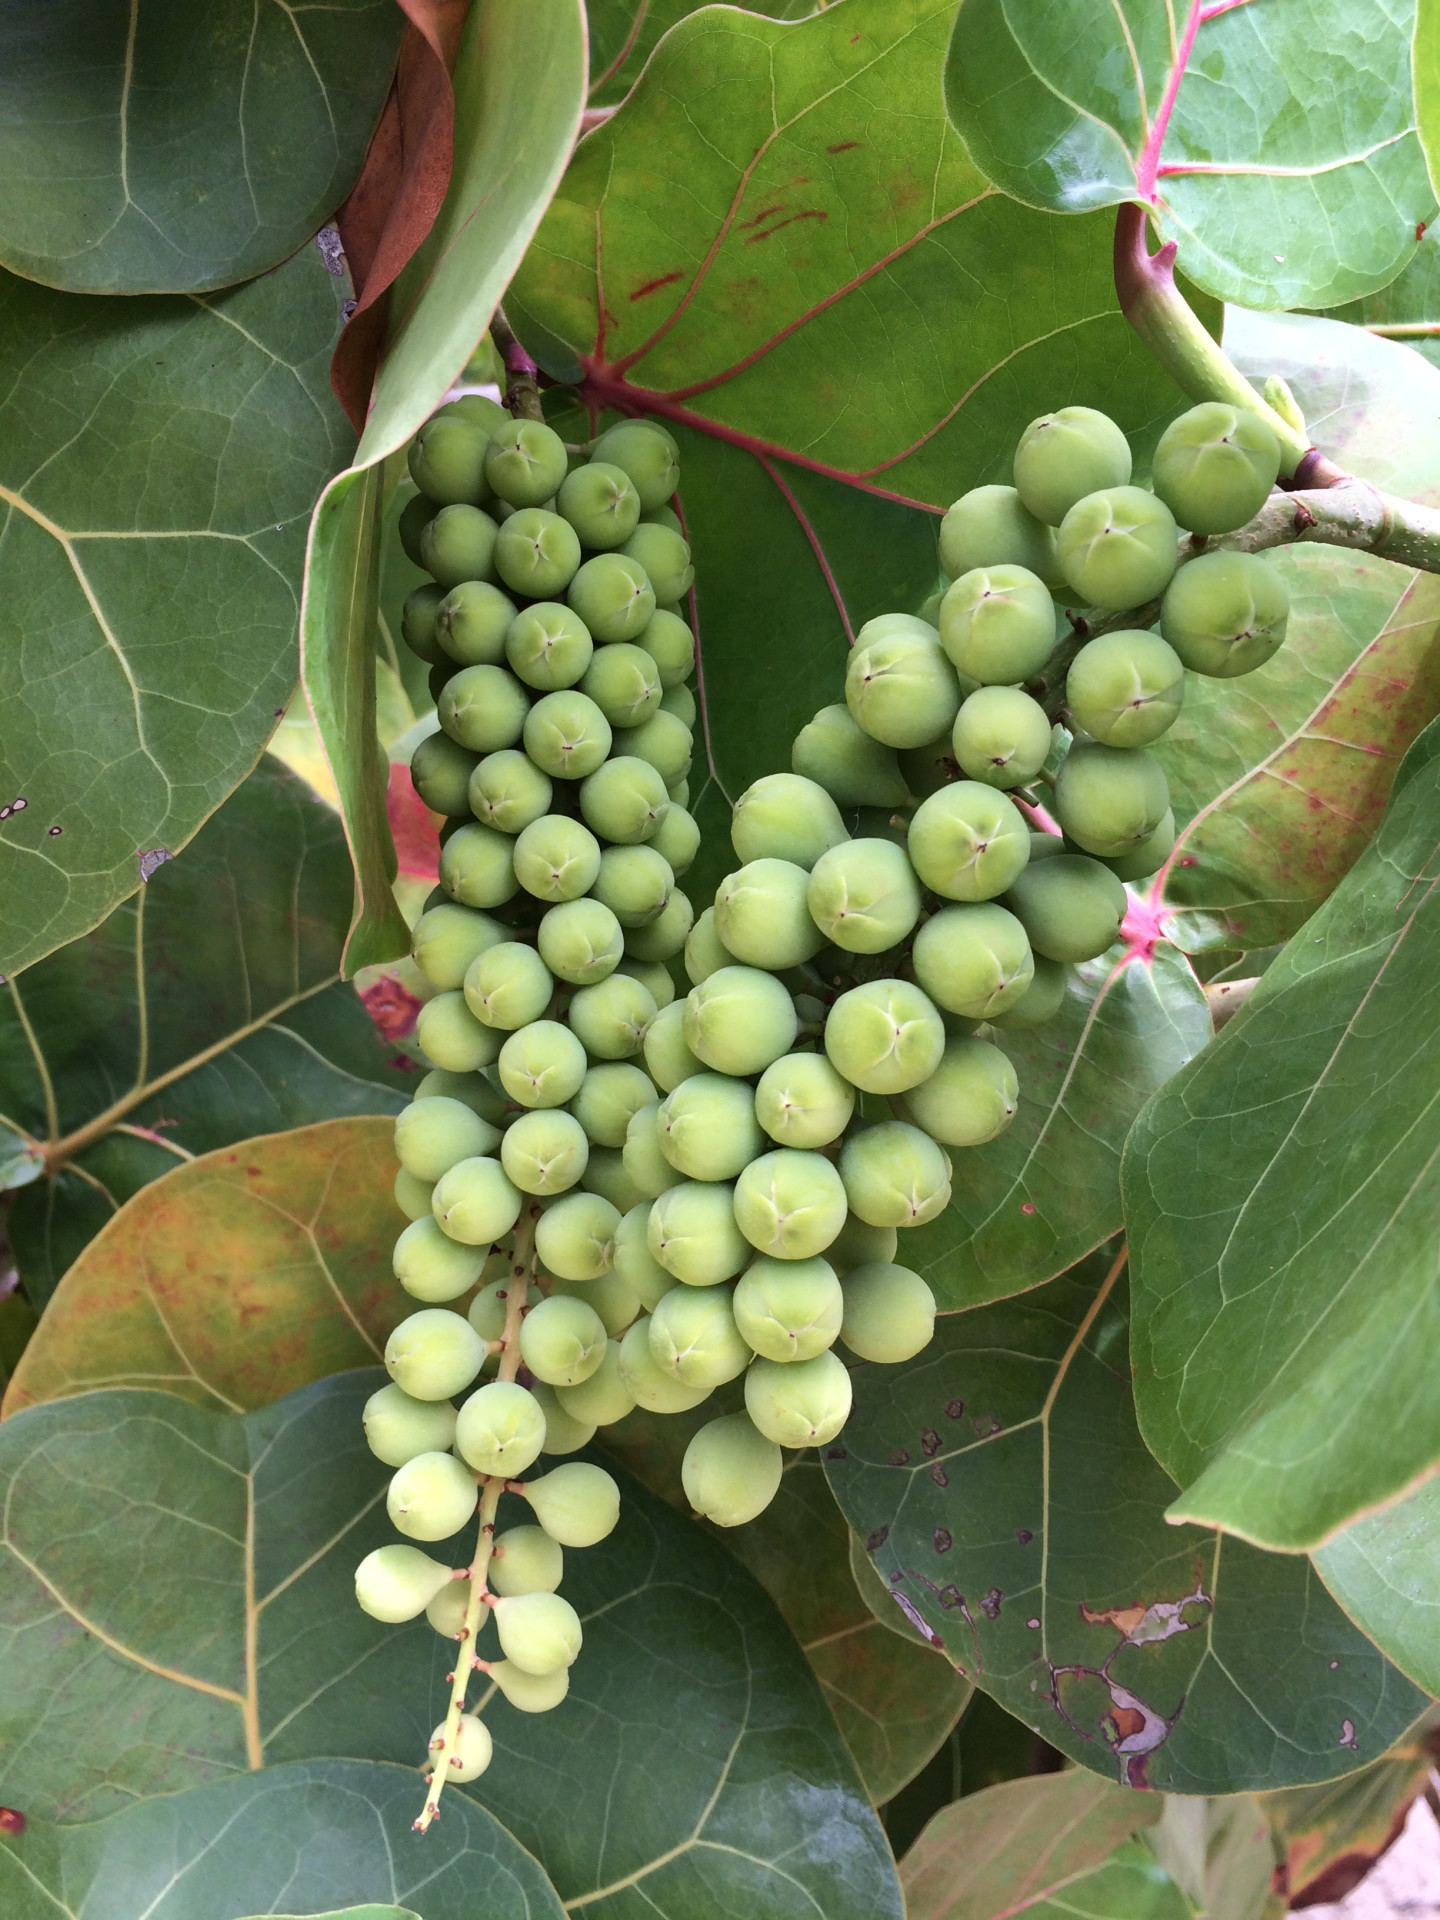
Figure 2. Unripe sea grape fruit clusters. Photo Credit: Drew Danielson, https://commons.wikimedia.org/wiki/File:Seagrape_(Coccoloba_uvifera)_fruit_at_Playa_Lucia,_Yabucoa,_Puerto_Rico.jpg.
Figure 3. Ripening sea grape fruit clusters. Photo Credit: Daniel di Palma, https://commons.wikimedia.org/wiki/File:Seagrape-bunch02.JPG.
Detection, Distribution & Monitoring
The native range of Sea Grape rust is along the coasts of southern Florida, the Caribbean, and tropical Americas (Parrotta, 1994). In Hawaii, sea grape rust was first reported in 2005 in Papuikou on the eastern coast of the island of Hawaii by a Japanese researcher, Dr. Yoshitaka Ono, at the Ibaraki University and recently detected on Oahu by a Hawaii Department of Agriculture (HDOA) plant inspector during an inter-island nursery inspection. The suspected disease was tentatively diagnosed with an infection of Uredo uviferae (Fig. 4 and 5) by the HDOA Plant Pathology Unit (HDOA-PPU) and confirmed by the USDA Animal and Plant Health Inspection Service Plant Pathogen Confirmatory Diagnostics Laboratory in Laurel, MD. The statewide distribution of this pathogen is not known and could be established on every island. If you suspect this rust in Kauai, Maui, Molokai, or Lanai, please contact HDOA-PPU ([email protected]) or your local University of Hawaii extension agent (https://cms.ctahr.hawaii.edu/ce/Find-Us).
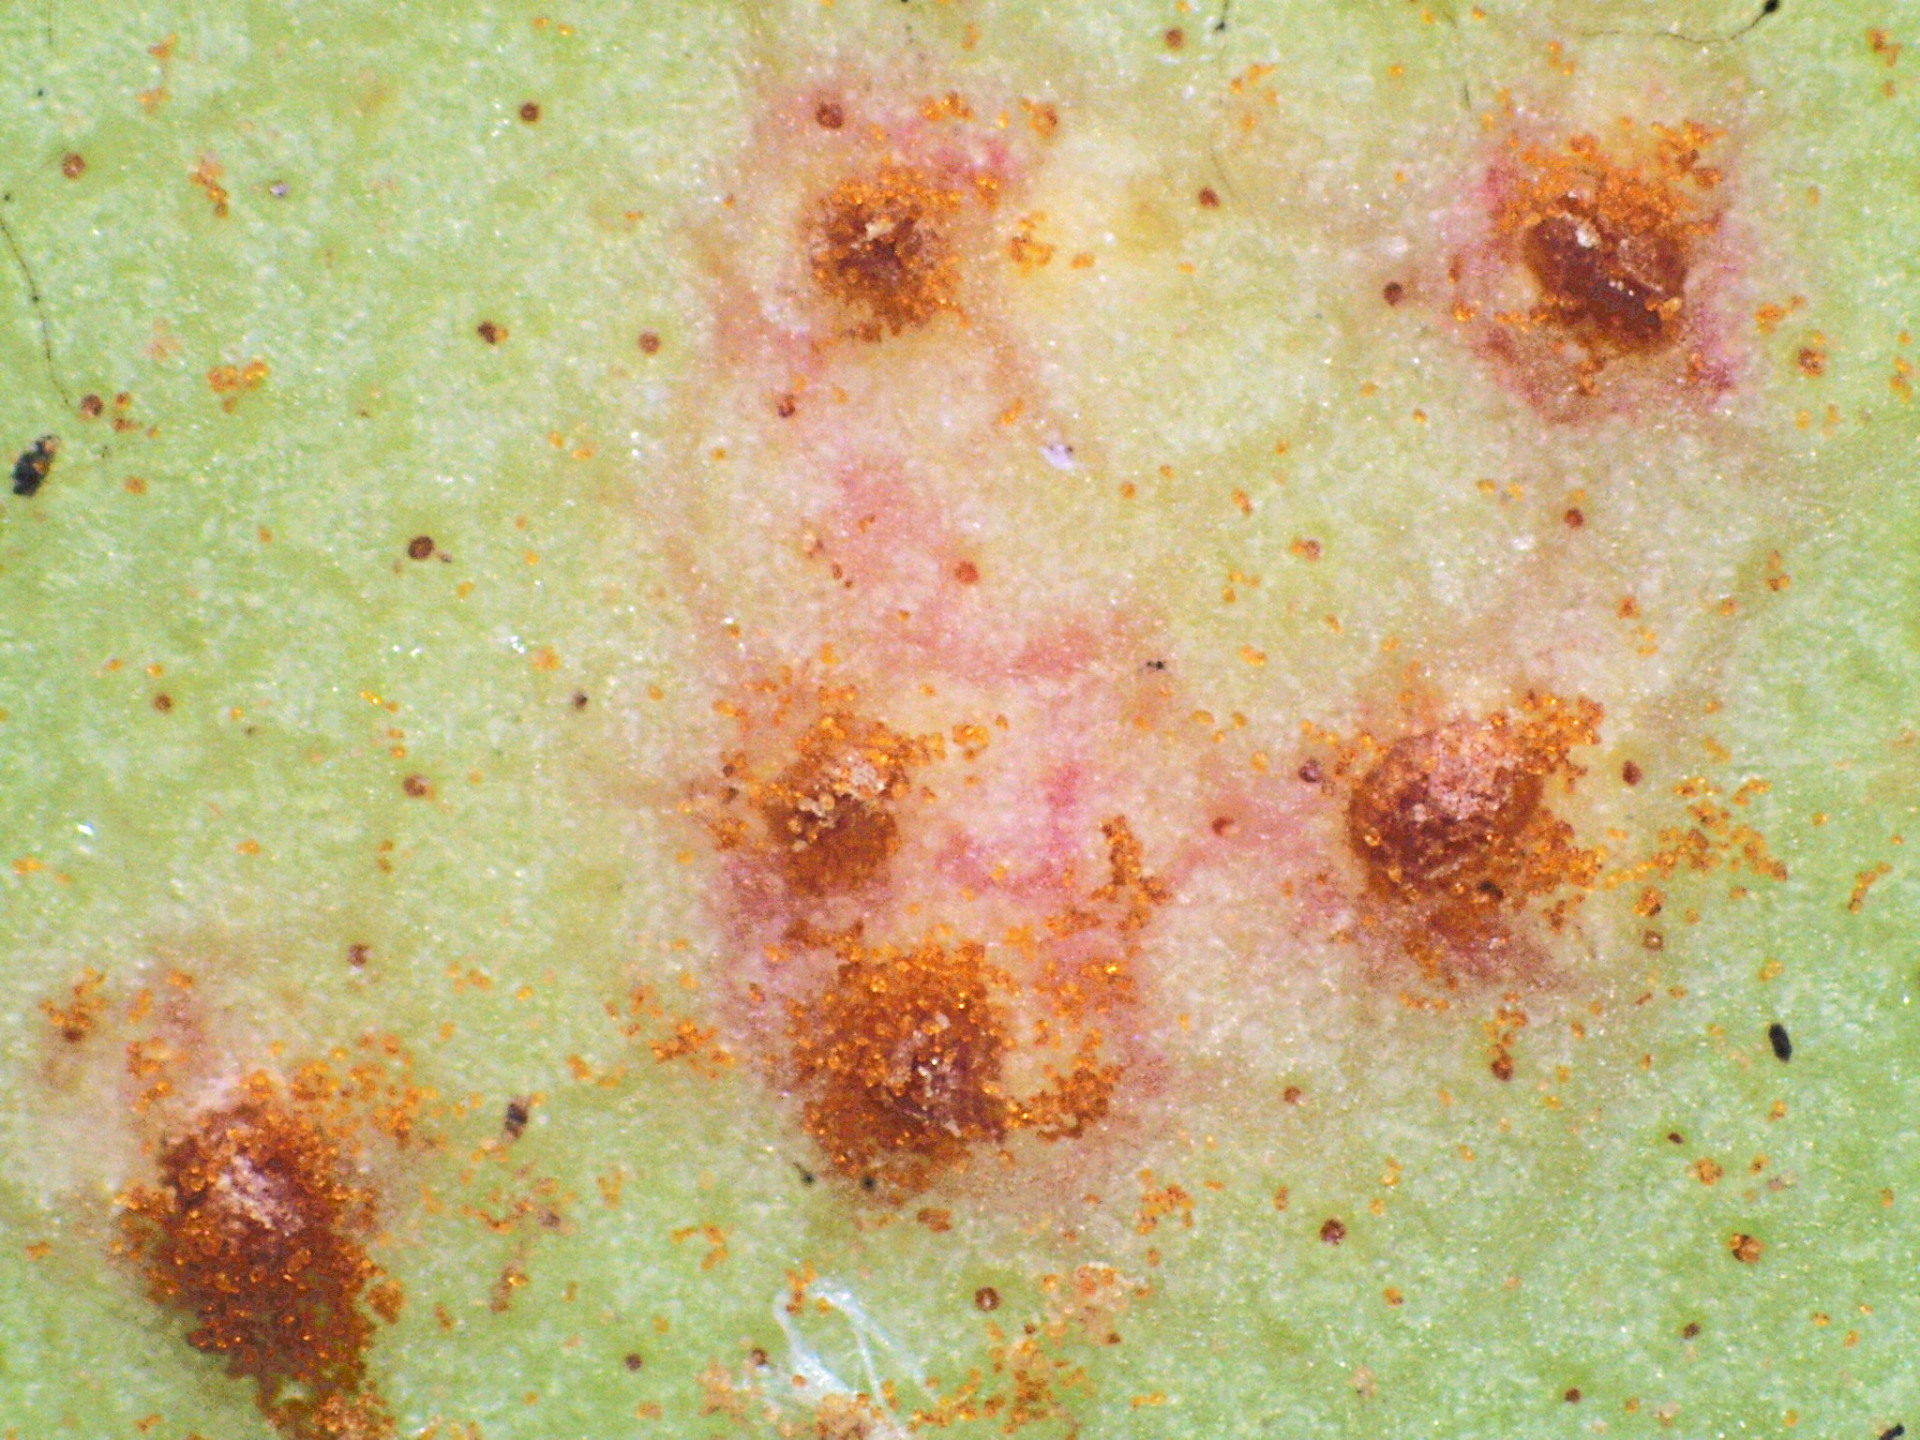
Figure 4. Rust pustules (Uredinia) on the lower leaf surface producing orange urediniospores. Photo Credit: Josiah Marquez.
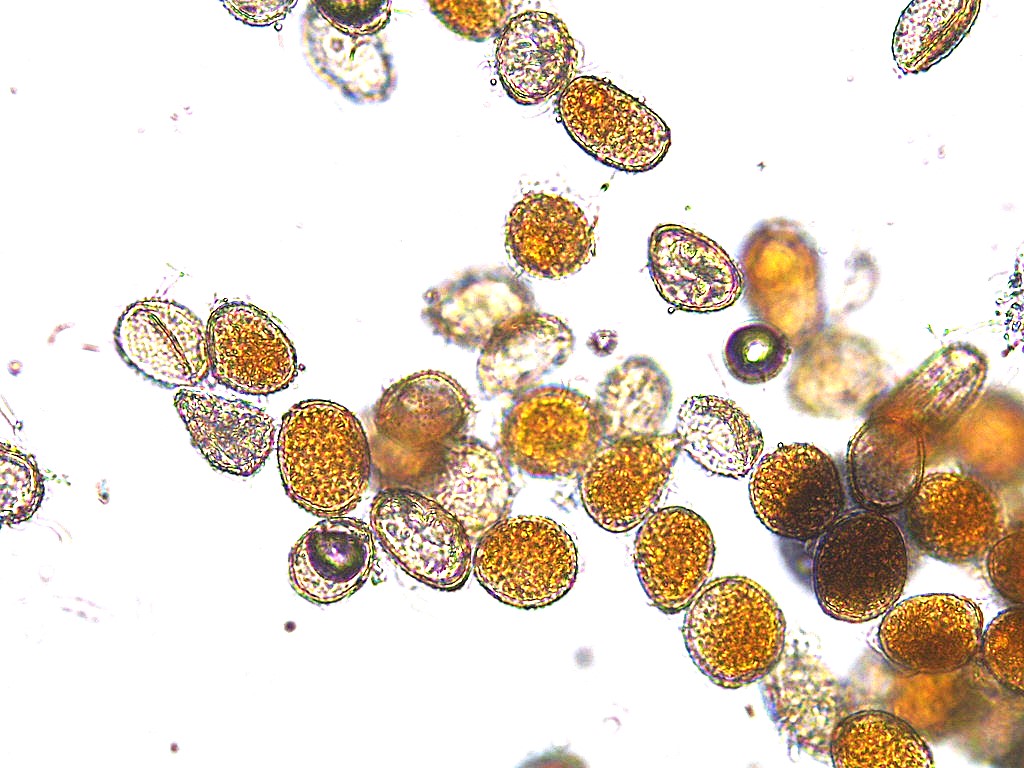
Figure 5. Urediniospores from rust pustules on the lower leaf surface of Sea Grape leaf at 400x magnification. Photo Credit: Josiah Marquez.
Background and Significance
Sea grape rust was first reported in Florida in 1960 (USDA, 1960). Subsequent reports were made in Puerto Rico and Venezuela in 1962 and 1973, respectively (Roure, 1962; Dennis, 1973). The impacts of sea grape rust are currently unknown, however, this pathogen could cause unsightly leaf spots and defoliation, resulting in Sea Grape decline. In areas with high humidity and rainfall, trees may be at a higher risk of developing more severe symptoms (Nelson, 2012).
Signs, Symptoms, and Management
The main symptoms of Sea Grape rust are reddish-purple spots or lesions on the leaf underside that are distributed in a scattered or densely grouped pattern (Fig 6). The lesions erupt to reveal a powdery mass of reddish-orange spores which are then carried by the wind and spread to other trees (Ono, 2020). To limit the spread of sea grape rust, we suggest implementing general rust disease management tactics like avoiding transplanting rust-infected seedlings or plant material into rust-free areas, removing severely infested leaves, disposing of fallen leaves, sanitizing tools in between plants, intercropping with other tree species, and improving aeration of the tree canopy (Nelson, 2012).
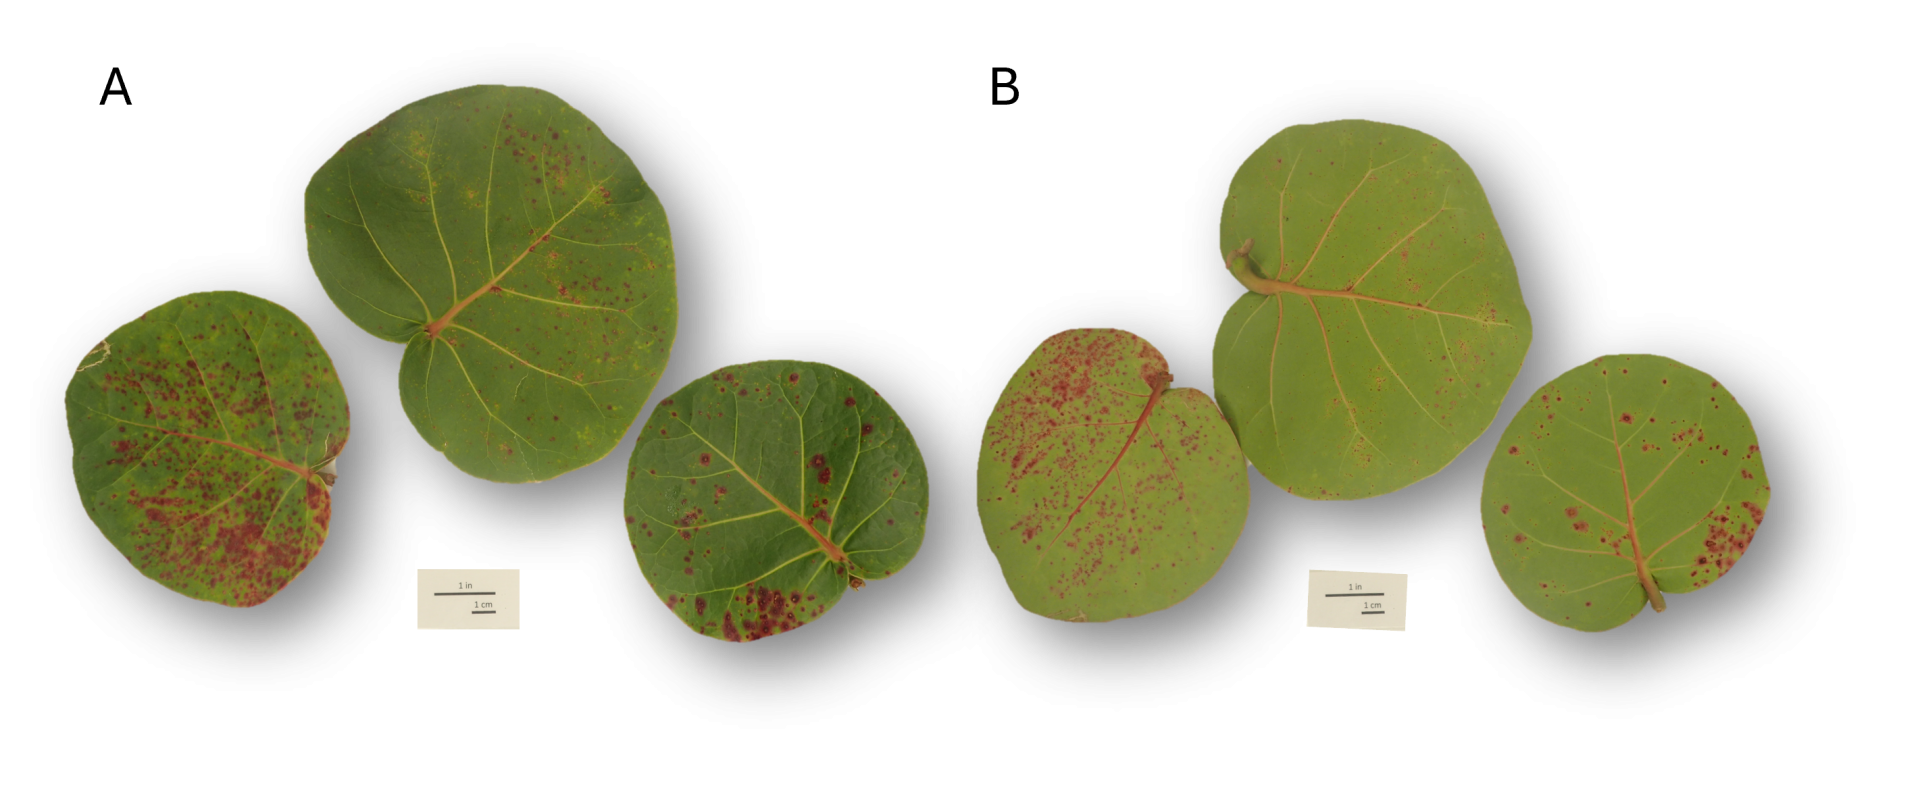
Figure 6. Red leaf spot symptoms on the upper (A) and lower (B) leaf surface. Photo Credit: Josiah Marquez.
References
Dennis, R.W.G. 1973. Fungus Flora of Venezuela and Adjacent Countries. Mycologia. 65:493-494.
Gilman, E.F. and Watson, D.G. 1993. Coccoloba uvifera seagrape. US Forest Service. Fact Sheet ST-175. https://hort.ifas.ufl.edu/database/documents/pdf/tree_fact_sheets/cocuvia.pdf
Little, E.L. and Skolmen R.G., 1989. Common Forest Trees of Hawaii: Native and Introduced (Vol. 679). US Department of Agriculture, Forest Service.
Nelson, S. 2012. Rust of tree heliotrope. College of Tropical Agriculture and Human Resources, University of Hawaii at Manoa. Extension Article PD-88. https://www.ctahr.hawaii.edu/oc/freepubs/pdf/PD-88.pdf
Ono, Y. 2020. Additional records of rust fungi (Pucciniales) in the Hawaiian Islands. College of Education, Ibaraki University. https://www.researchgate.net/publication/340011374_Additional_records_of_rust_fungi_Pucciniales_in_the_Hawaiian_Islands
Parrotta, J.A. 1994. Coccoloba uvifera (L.) L. Sea grape, Uva de playa. US Forest Services. https://data.fs.usda.gov/research/pubs/iitf/sm_iitf074%20%20(5).pdf
Roure, L.A. 1962. The Rusts of Puerto Rico. ProQuest Dissertations & Theses.
USDA. 1960. Index of Plant Diseases in the United States. Agricultural Handbook No.165. https://archive.org/details/IndexOfPlantDiseasesInTheUS/mode/1up
Kimi Kawasaki,
[email protected], Plant Pathology Unit, Department of Agriculture,
Soil Biology Series: Empowering the Community to Build Better Soils

By: Kyle Franks
The demand for practical methods to enhance soil health remains high, particularly among those maintaining subsistence farming systems. A needs assessment conducted last year revealed that approximately 50% of survey respondents prioritized composting as a key strategy for meeting their agricultural needs. Responding to this insight, a three-part Soil Biology Series was developed and delivered in two cohorts to accommodate high demand despite limited space.
The series provided participants with foundational knowledge and hands-on experiences designed to deepen their understanding of soil microbiology and its applications in sustainable agriculture.
Part One: Foundations of Soil Microbiology
The first session introduced participants to the complex and fascinating world of soil microbiology. Key topics included the major players in the soil ecosystem—bacteria, fungi, nematodes, protozoa, and microarthropods—and the critical role they play in nutrient cycling.
Participants explored how anaerobic conditions develop and learned how oxygen, water, and microbial activity transform dirt into healthy, productive soil. A significant focus was on predator-prey interactions within the soil food web, emphasizing how these dynamics regulate nutrient availability, ensuring plants receive essential nutrients precisely when needed.
The session concluded with practical techniques for creating and applying beneficial aerobic microbiology to gardens and fields, equipping participants with actionable strategies to enhance soil health.
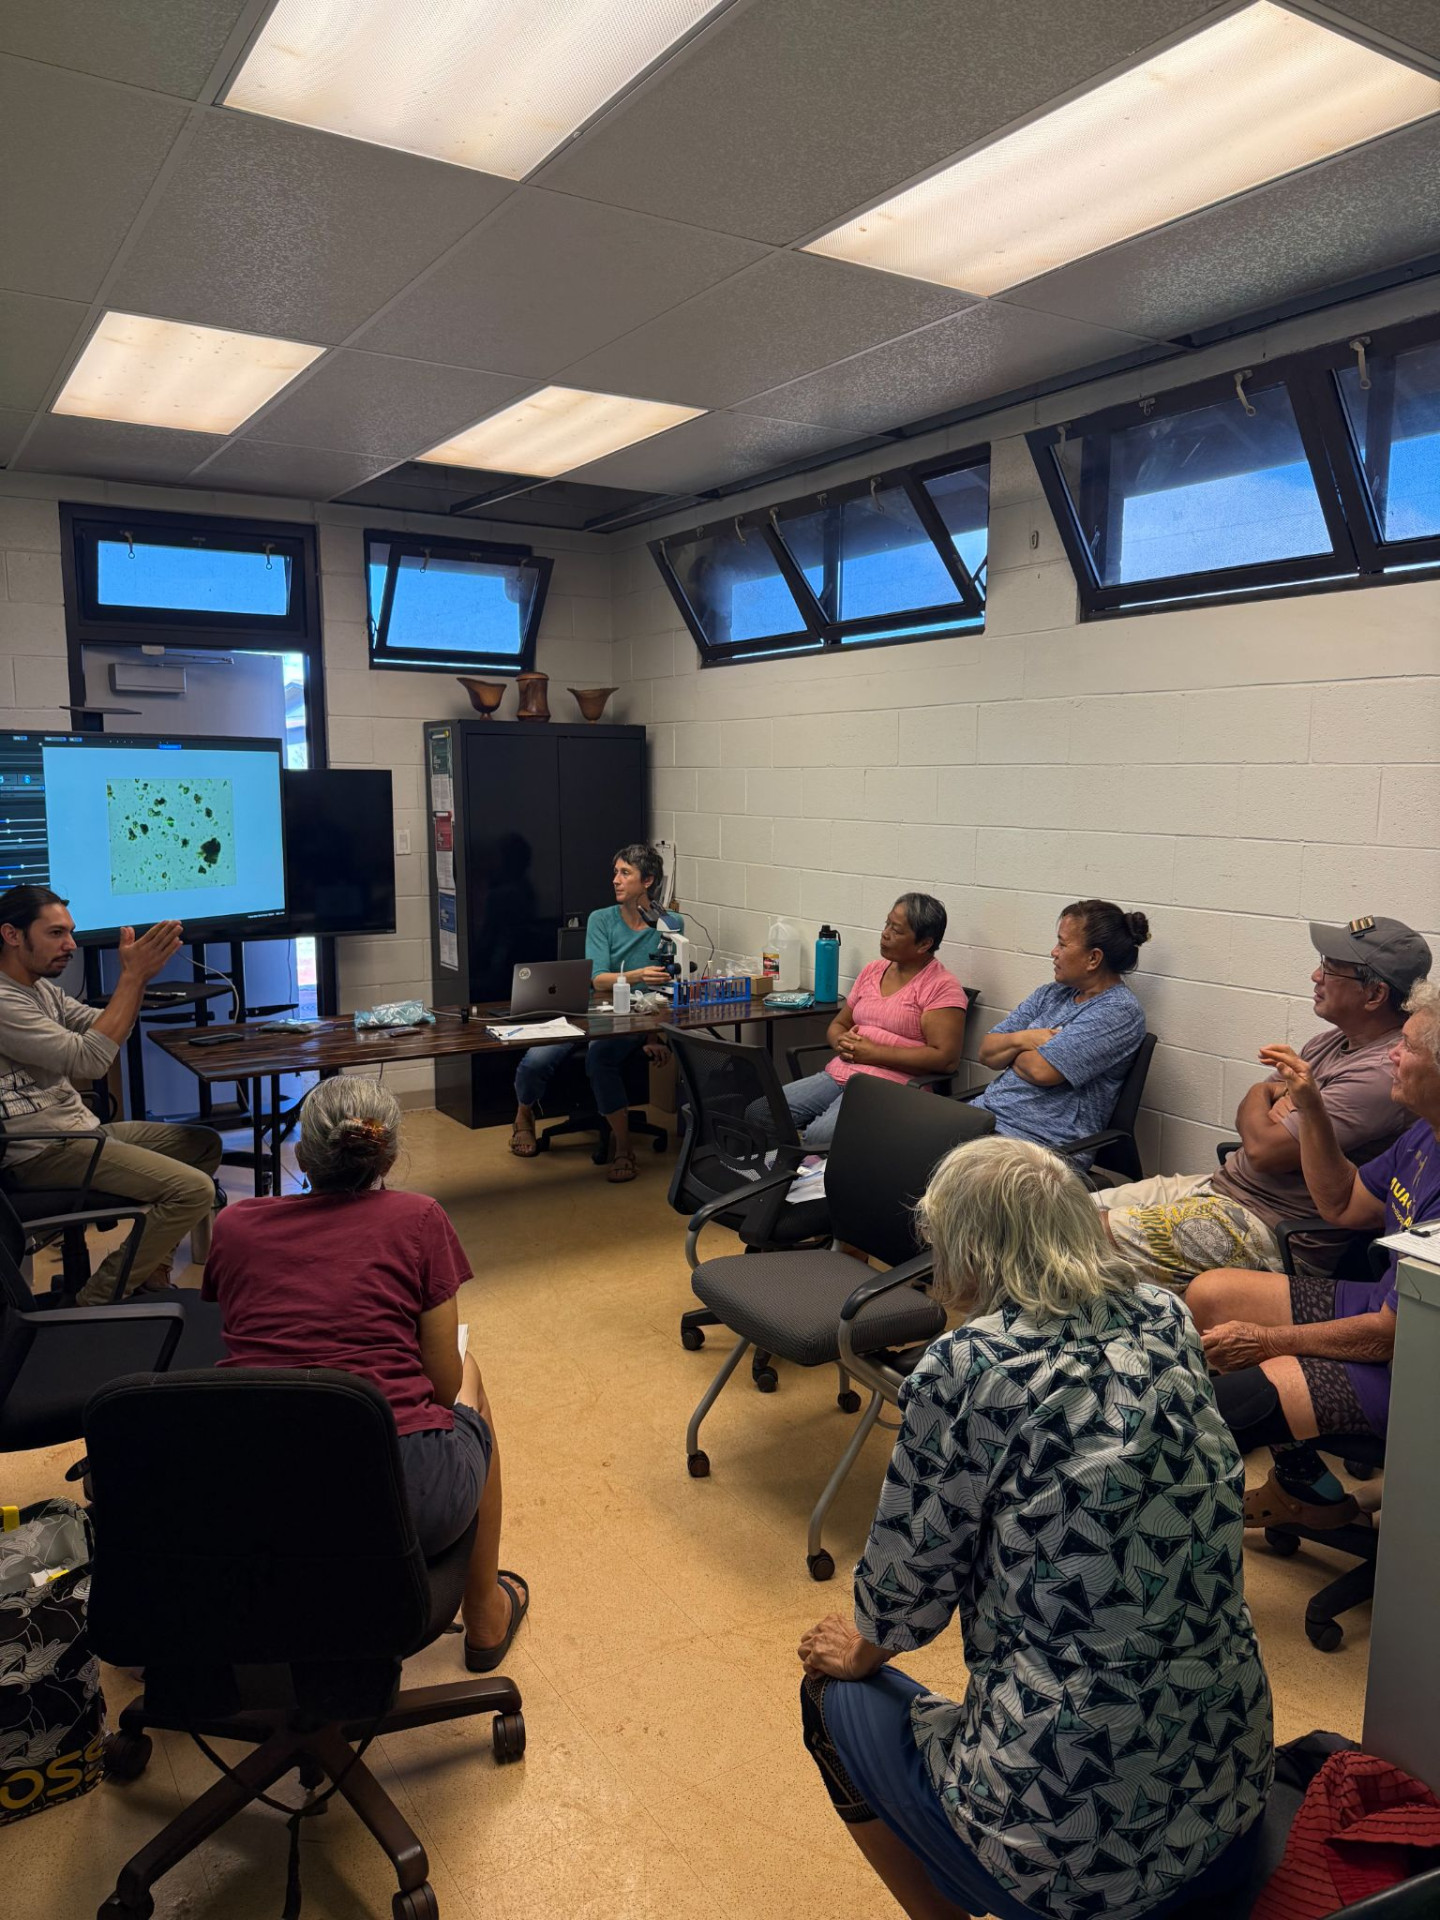
Figure 1. Students exploring fundamental soil biology.
Part Two: Soil Assessment and Microbial Diversity
The second session featured Bianca West, a certified soil technician and graduate of Dr. Elaine Ingham’s Soil Food Web School. With her guidance, participants brought in their own soil samples and learned proper collection methods for accurate analysis.
Using a compound light microscope, students observed live microbial communities in their soil, displayed on a large screen for interactive learning. They gained skills in slide preparation and microbial diversity counting, enabling them to assess soil health independently.
This hands-on experience provided participants with a clear understanding of their soil’s microbial strengths and weaknesses, empowering them to take targeted action toward improving soil fertility.
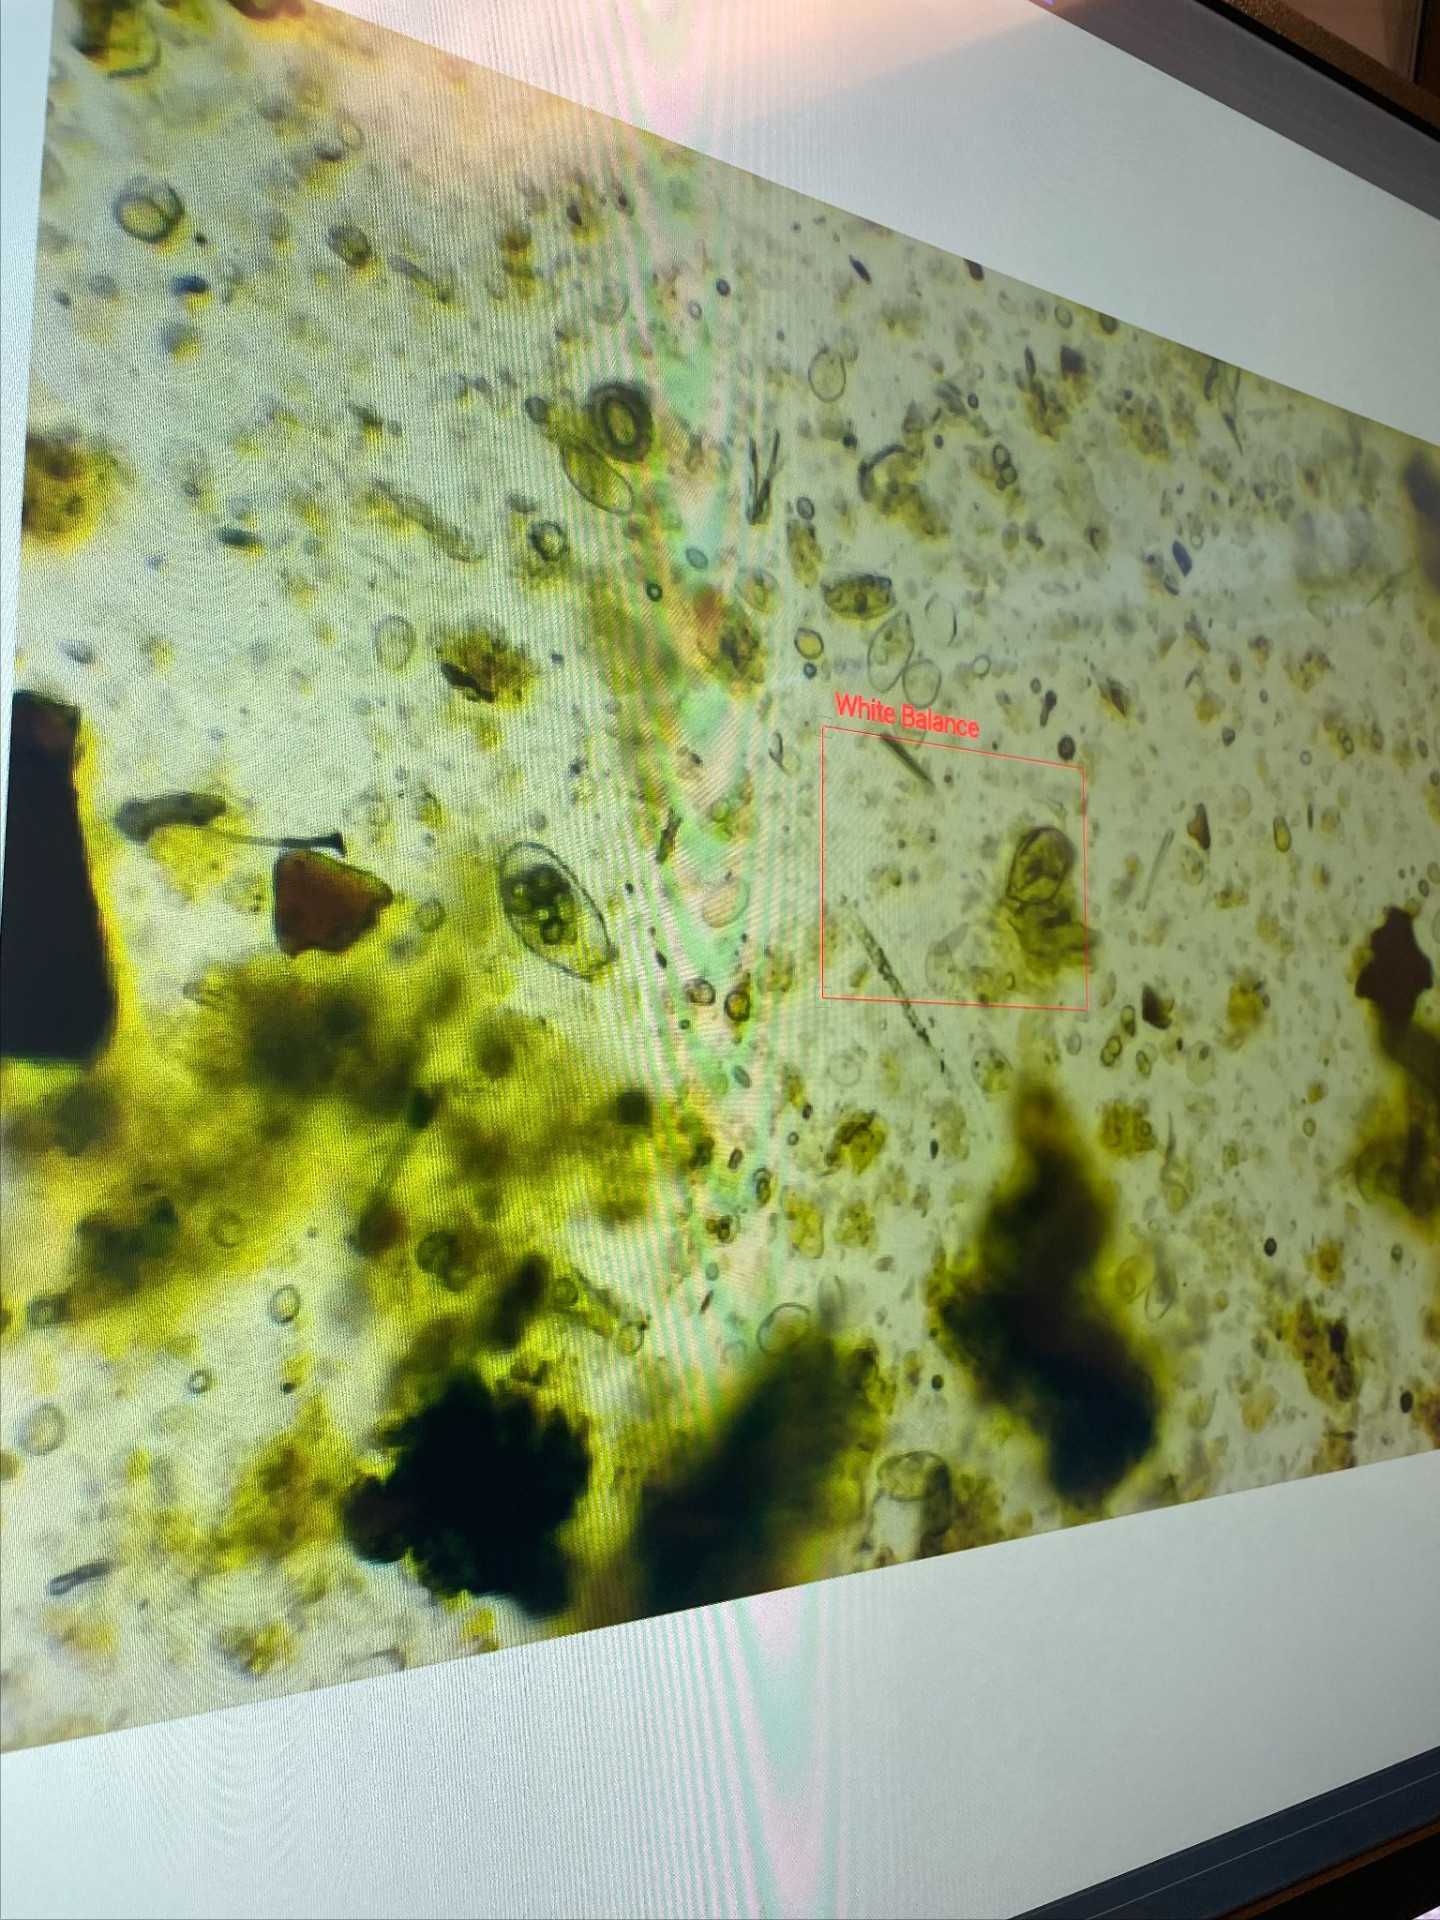
Figure 2. A look a healthy, diverse compost.
The final session was a practical demonstration of populating and distributing beneficial soil microbiology. Participants began by assessing compost under the microscope to ensure it was biologically active and contained the appropriate microbial "players."
They then created compost extract, a process that takes less than 30 minutes, and learned the steps to brew compost tea for extended application. The group applied the compost extract in a local food forest, sparking in-depth discussions about food production, composting practices, and sustainable farming strategies.
To celebrate their learning journey, participants received a soil biology book and a compost tea lab kit, generously funded by the Department of Hawaiian Home Lands (DHHL), ensuring they could continue their soil-building efforts at home.
This series not only enhanced participants' technical skills but also fostered a deeper appreciation for the intricate connections between soil health and food production. The overwhelmingly positive feedback underscores the importance of accessible, science-based education in empowering communities to create sustainable agricultural systems.
By equipping participants with knowledge and tools, the Soil Biology Series is helping to cultivate a culture of stewardship, where healthy soils form the foundation for resilient, thriving ecosystems.

Figure 3. Cohort 2 students receiving their compost tea kits.
Kyle Franks, Jr. Extension Agent-DHHL, Molokai Cooperative Extension
Making a Coconut Crown Spray and Pump Cart

By Alberto Ricordi and Brown Cannon
The RC (Ricordi/Cannon) Crown Spray System was created through a collaboration between Alberto Ricordi and Brown Cannon. We want to thank Brent White for sharing his experience building and operating his own prototype. A walk-thru video of the RC CS System is available on YouTube: https://youtu.be/T18erO8vNxI?si=HJpOTbShFIDihxdA
The RC Crown Spray System was developed to make frequent sprays of the crown of coconut palms (Cocos nucifera) more practical and cost effective, when compared to spray methods that require climbing or a lift to reach the crown of palms for every spray treatment. In the RC System, a stationary halo with spray nozzles is secured on the crown of the palm. This can be easily done when the palm is regularly pruned or trimmed. The halo is connected to a quick coupler near the ground, using a swing pipe that us secured to the palm trunk using 1/2" pipe clamps. For spraying, the quick coupler at the base of the palm connects to a mobile spray system that can service multiple palms using the same quick coupler attachment. This allows for spraying the crown of the palm from the ground, without climbing or a lift.
Recent trials from CTAHR showed that 2.5% Basil essential oil was effective in preventing damage from CRB when sprayed in young palms at a 3-to-4 week interval (Ricordi, 2024). A shorter treatment interval might provide better results in highly infested areas, such as weekly or bi-weekly spray. When a 6% solution of essential oil was directly sprayed on CRB collected from an infested mulch pile in Waianae, the 6% solution caused instant irritation of CRB (see middle row in this short video) and 66% mortality rate after 4 days (Ricordi and Silva, 2023). Previous research from India, where CRB is a native species, showed that several essential oils cause mortality and repel CRB (Ravindran et al, 2019). The RC Crown Spray System can be used for insecticides or repellents with short residual effect, as part of a integrated pest management (IPM) for protection from coconut rhinoceros beetle (CRB) damage, or any other pests.
The RC Crown Spray System can be pre-assembled off-site for easy installation and use on site. It consist of:
- a halo with spray nozzles that is secured to the crown of the palm (Figures 1 and 2);
- a swing pipe connecting the halo to a quick coupler at the base of the palm (Figures 3 and 4); and
- a mobile cart that transports a tank with a booster pump to each palm (Figure 5).
Multiple palms can be connected to a single quick coupler to reduce the number of connections and the time required for treatment, as shown in Figure 4. The quantity of multiple palms per connection will depend on the specs of the pump, height of the palms, and distance between palms. The halo must be adjustment every 4 months or so, as new fronds that emerge can block the spray nozzles. The closer the halo is installed to the central spear, the longer it can stay in place before it needs adjustments. Therefore, proper diameter of the halo is very important. The use of quick couplers makes adjustments easy and non-destructive. We are cautiously optimistic this RC Crown Spray system will work for applications that require frequent spray of the crown, and wish to get information out to the industry so that others can try it and report back on any challenges or innovations. Long term testing and observation will give more clarity on how the materials can withstand the different types of solutions. Nothing presented in this article is proprietary. Everything is experimental and everything can be improved upon. For example, we realized during our first tests that we could add a 1/4" tubing into the halo with a mister at the end and wedged the mister or tubing next to the top spear, similar to what is done with hapu'u in landscaping (native Hawaiian tree ferns). However, climbing a coconut palm can be risk and that's why it is important to share information, so we can move forward efficiently. Managing CRB requires all of us to collaborate and find ways to manage this invasive pest that arrived in 2013. Please do not hesitate to contact [email protected] if you have an idea or innovation that could improve the efficiency of this system, or anything else that could be used to manage CRB.
Figure 1. Group of palms with the RC System's halo installed. The spray halos blend in and are barely noticeable, making it suitable for landscape use.

Figure 2. Close up of a palm with the RC System's halo installed.
Figure 3. Palms with individual quick coupler connections. The swing pipes are installed on the back side of the trunk.
Figure 4. Connecting three (3) palms into a single quick coupler to reduce the time required for spray.
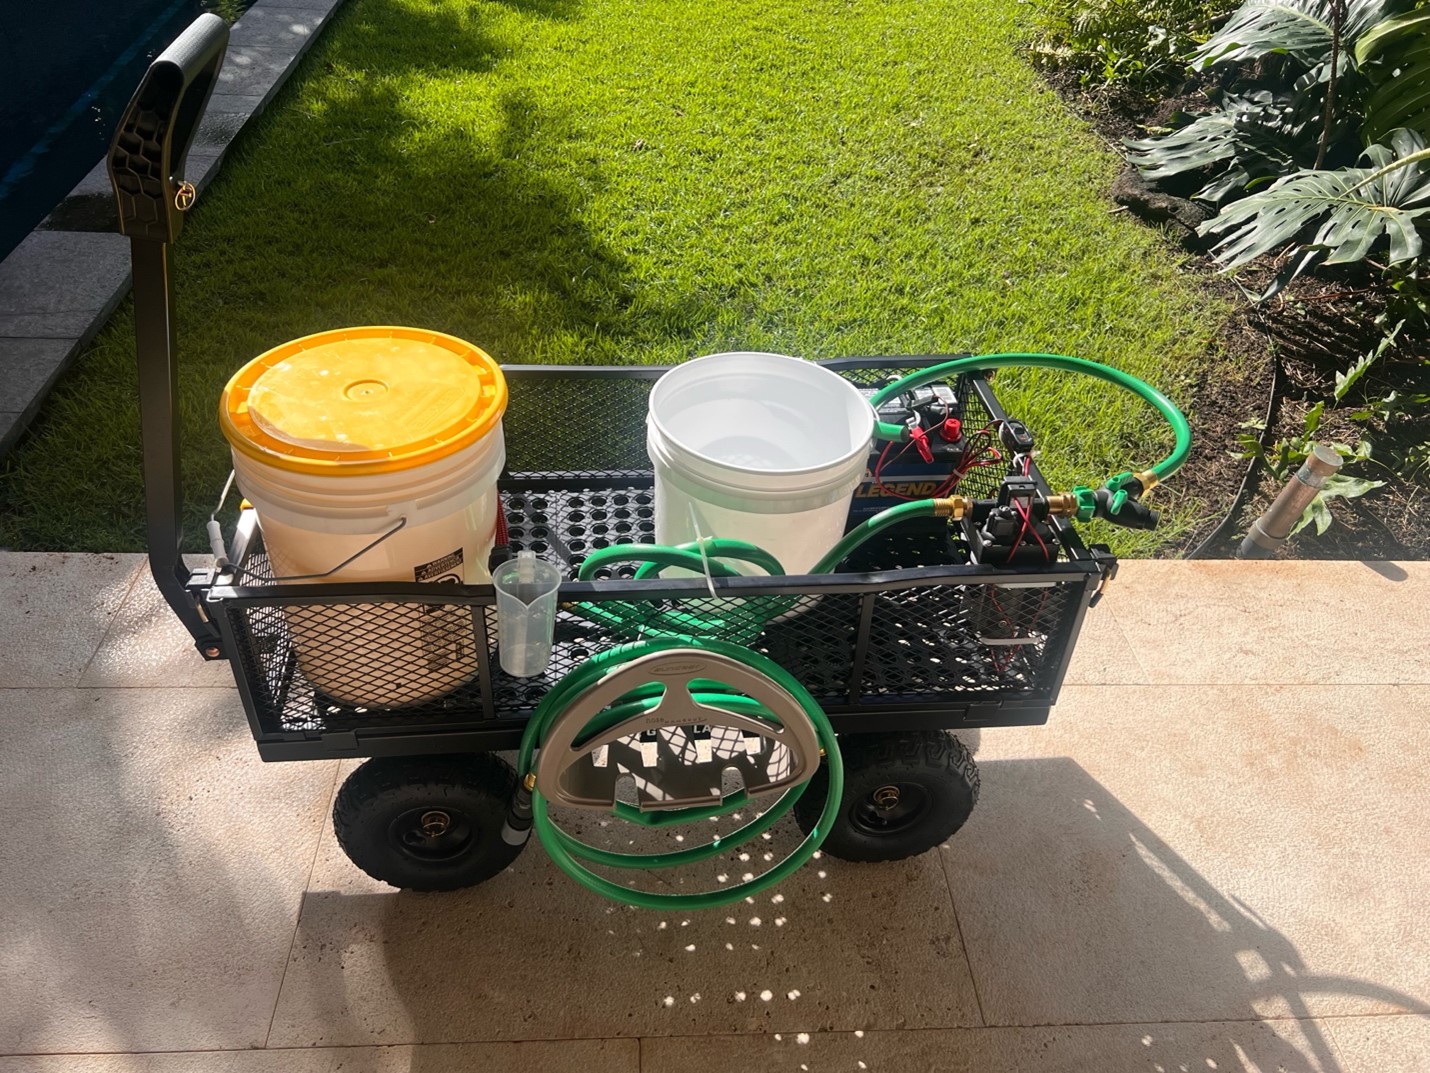
Figure 5. First version of a cart to transport a tank to hold the a solution, booster pump, battery, and hose to connect to the quick coupler at the palms to be sprayed.
Here are the instructions for assembling the RC System and some reference costs:
Spray Halo
The RC Spray system Halo (Figure 6) is made using the following components:
• Swing Pipe
• Two Quick Coupler assemblies
• Three Spray Nozzle assemblies
• Barb fittings
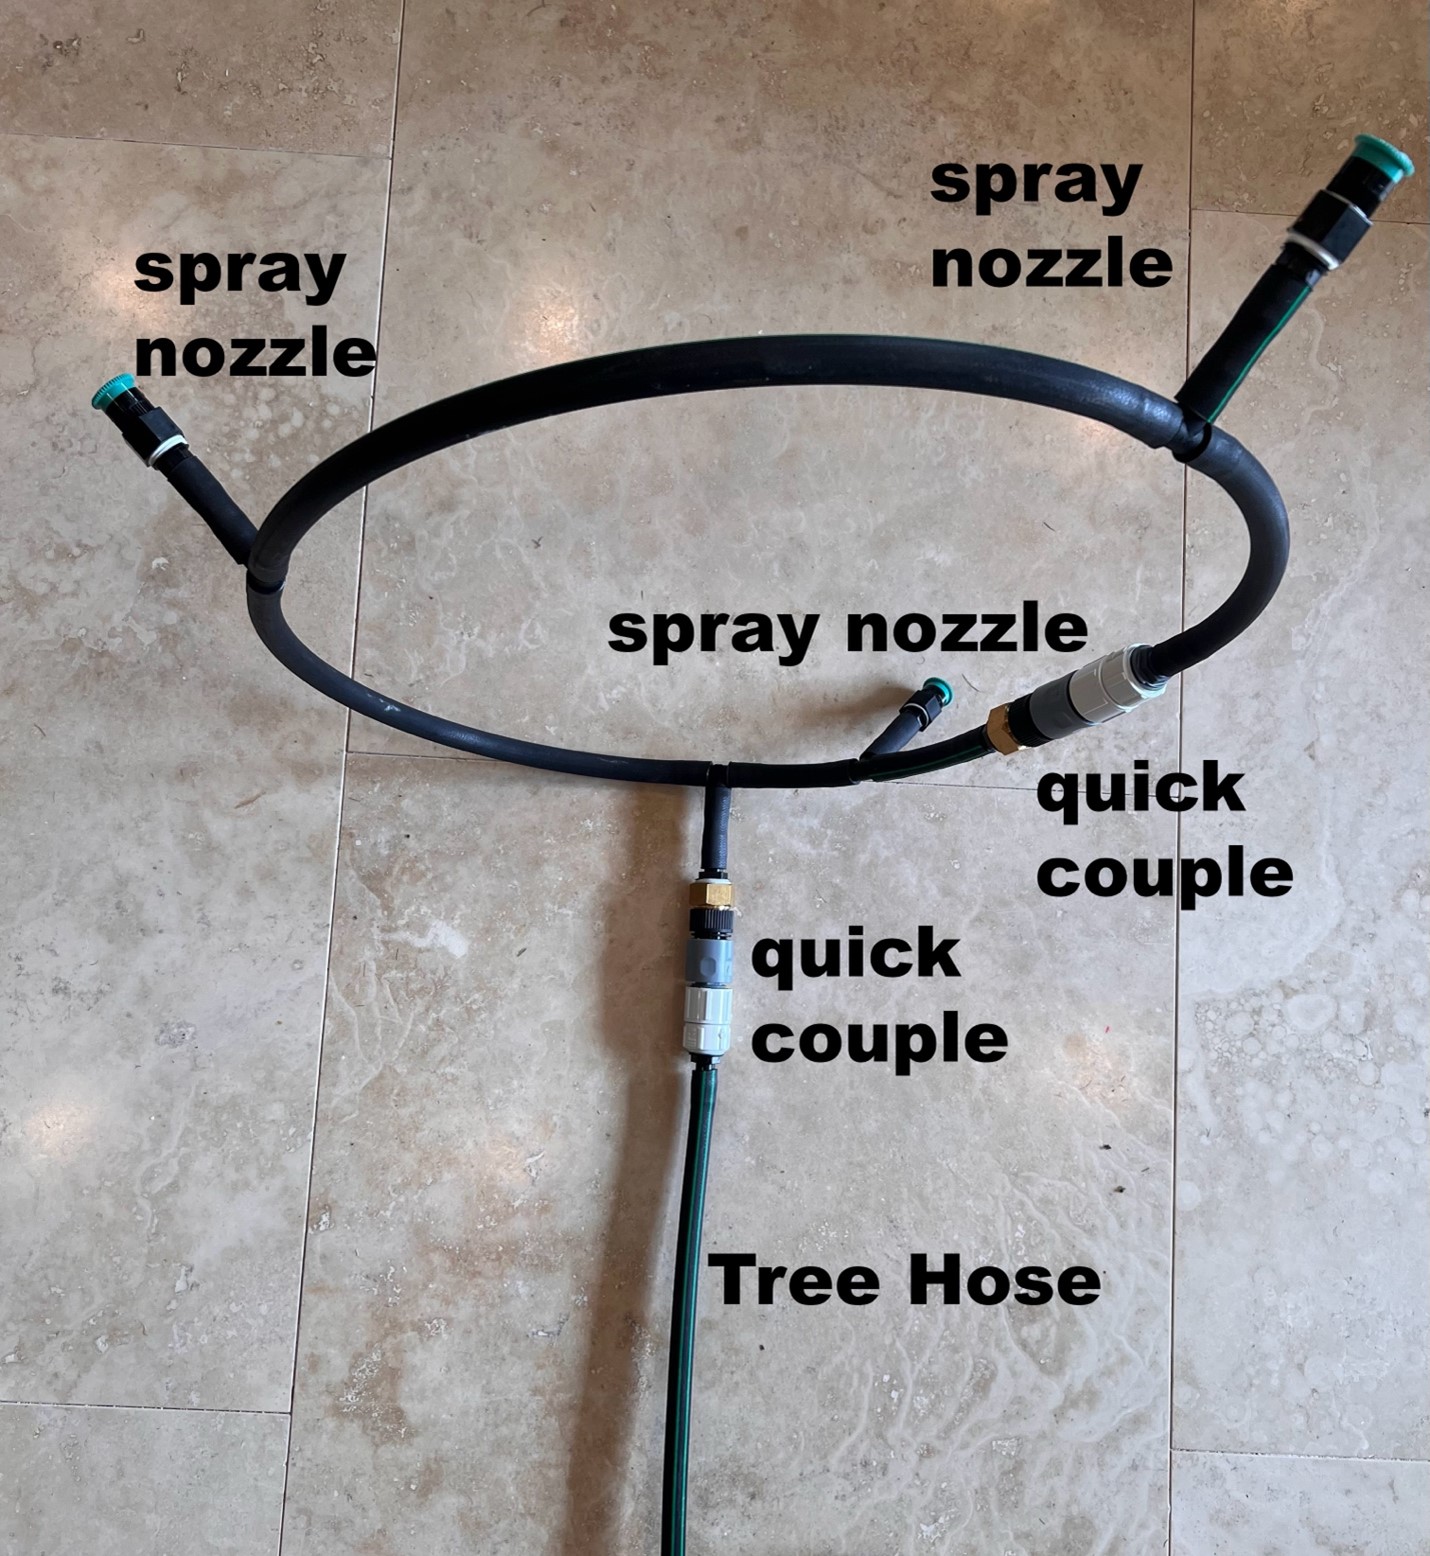
Figure 6. RC System halo components.
Start by assembling the two (2x) quick coupler assemblies (Figure 7):
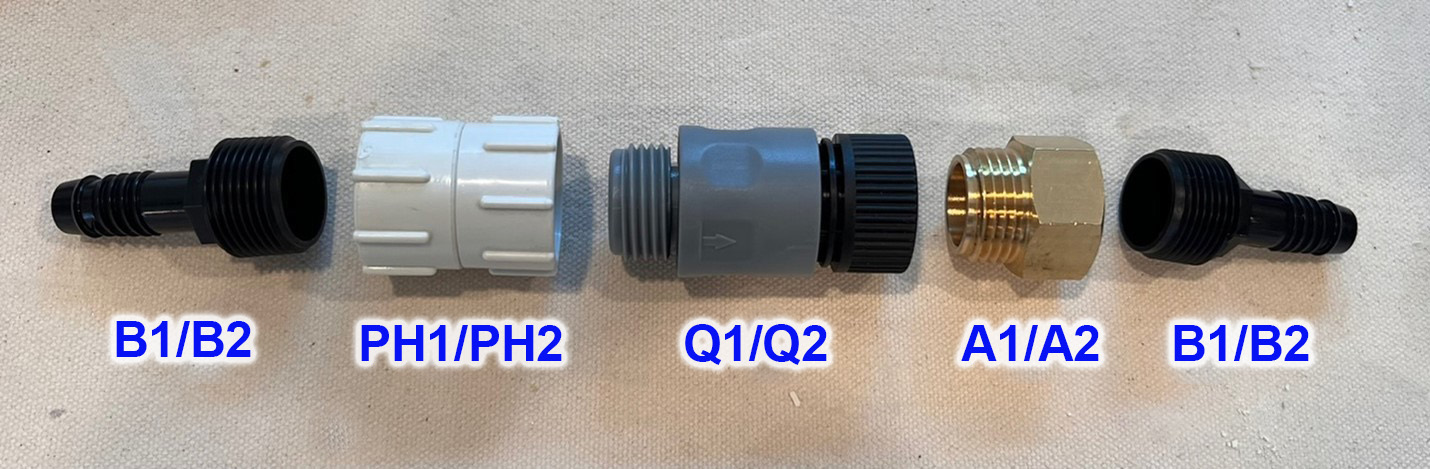
Figure 7. RC System Halo spray quick coupler assembly.
B1/B2. Barb to 1/2" thread 0.75” Funny Pipe Adapter MPT (FPA-075' $0.39/unit)
PH1/PH2. Pipe thread to Hose thread (AP-106 0.75” x .75” Swivel ADP FIPT x FHT; $3.20/unit)
Q1/Q2. Quick coupler (such as Liluo Tool 3/4” Plastic Water Hose Fitting Male and Female with check valve; 1.20/unit)
A1/A2. Pipe thread to hose thread adapter (Brass .75" GHT Male x .75” NFT Female; $2.50/unit)
Assembling from left to right, make two of the quick coupler assemblies:
1. Attach B to the pipe thread end of PH. Use seven wraps of Teflon tape and attach snuggly.
2. Attach the male end of Q to the hose thread end of PH making sure there is a washer in place in B.
3. Attach the thread end of A to the female end of Q, making sure there is a washer in Q.
4. Finally, wrap the second B with five wraps of Teflon tape and attach it to the female side of the quick coupler Q.
Next, assemble three spray nozzle assemblies (Figure 8, left), and one tee connection to quick coupler assembly (Figure 8, right):
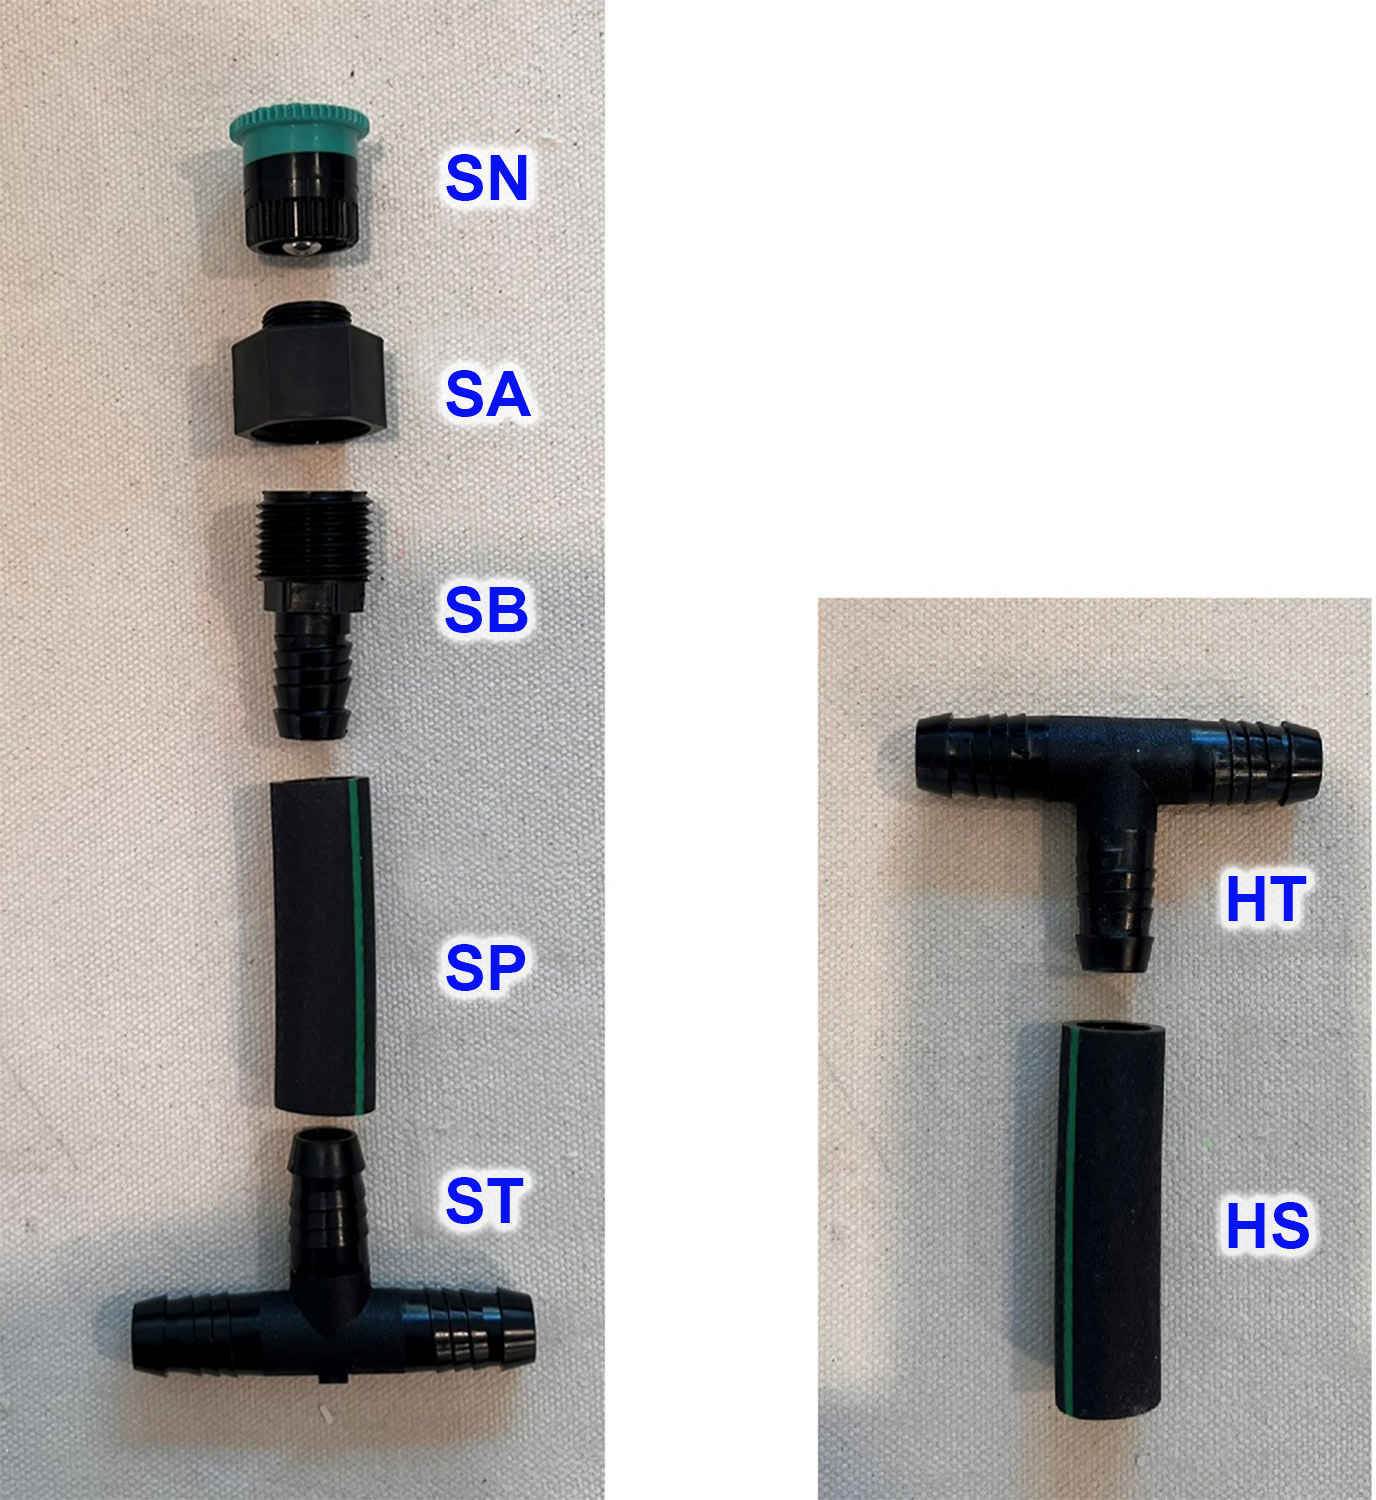
Figure 8. Spray nozzle assembly (left, red letters) and tee to quick coupler assembly (right, green letters).
Parts list from top to bottom:
SN. 4’ Spray Nozzle ADJ 0-360 DEG ($0.93/unit)
SA. PSA-M Plastic Shrub Adapter ($0.38/unit)
SB. FPA-0500 .50” Funny Pipe Adapter MIPT x INS 3400-005 ($0.39/unit)
SP. Swing pipe ($24.03/100 feet)
ST. 1/2” Funny Pipe Tee ($0.49)
Assembling Spray Nozzle Units, from top to bottom. Make three (3) assemblies. Large palms might require additional spray assemblies.
5. Screw on spray nozzle SN to a Teflon taped shrub adaper SA. The Teflon tape will allow for easier adjustment of the spray nozzle direction without leaking. Tip: Fold a strip of 1/2" Teflon tape in half and wrap it once around the threaded end of the shrub adapter SA. Screw the spray nozzle SN on snuggly.
6. Next wrap the threaded end of SB with 5 wraps of Teflon tape and screw it into the shrub adapter SA.
7. Cut off a 2 1/4" piece of Swing Pipe SP and insert it on the barb end of SB. A rubber mallet and/or dish soap makes this task easier.
8. Insert the other end of the 1/2” Swing Pipe SP onto the “Tee” ST. The spray nozzles assemblies are complete!
Assembling tee to quick coupler assembly.
This is the tee that connects the Halo to the swing pipe running down the coconut tree.
HT. halo 1/2" Swing Pipe TWW ($0.39/unit)
HS. halo 1/2" Swing Pipe ($24.03/100 feet)
Assembling from top to bottom
9. Cut a 2 1/4” long piece of Swing pipe HS (from the same roll that was used for the SP pieces) and insert the center of the “Tee” HT into the 2 1/4” long piece HS. Again, a rubber mallet and/or dish soap makes this task easier.
You are now ready to assemble the Halo. See diagram (Figure 9) and assembly steps below for a 19.5" diameter halo.
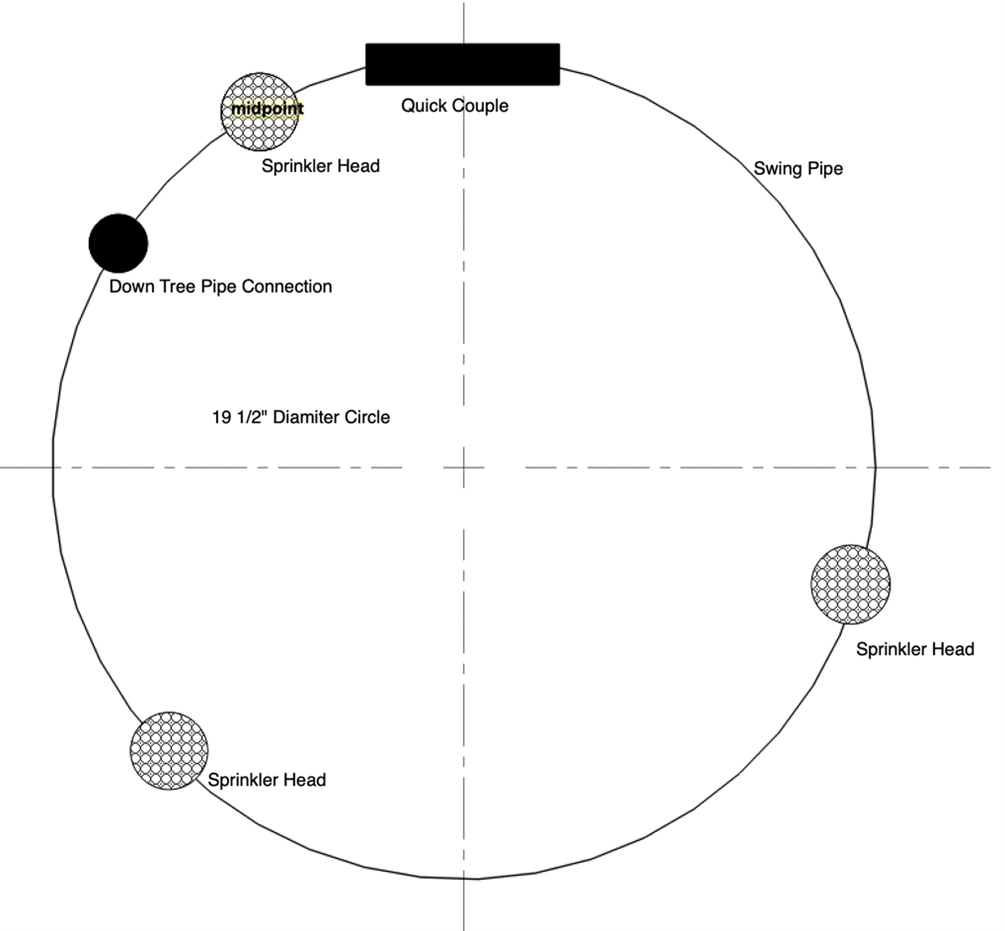
Figure 9. Diagram of a 19.5" diameter halo. The diameter of the halo will vary depending on the size of the crown.
10. Cut a 52” length of Swing pipe.
11. Insert one of the quick connect couplers to the end in your right had and make sure the brass piece on the coupler is closest to the swing pipe.
12. Measure 4” of pipe from the connection and make a cut.
13. Insert one of the spray nozzle units so the nozzle is above the green lines on the pipe.
14. Attach the other end to complete a circle.
15. Measure 4” again and make a second cut.
16. This time attach the part that goes from the Halo to the tree hose. Make sure it’s pointing down or 180 degrees from where the spray nozzle unit is pointing.
17. Now using the existing spray nozzle unit as a reference, make two marks on the circle of pipe to divide it into thirds and cut the pipe on those two marks. Insert the other two spray nozzles and the Halo is almost complete.
18. The last thing you need to do is connect the quick coupler assembly to the Halo down pipe hose connection (the brass end closest to the halo). In the next step you will disconnect the quick couple and use the bottom half to attach to the top of the Swing pipe going down the tree.
The pipe down the trunk of the palm will be part of a roll of 100’ of Rainbird Swing Pipe. Remove the bottom half of the quick connect on the halo (the quick connect that attaches to the hose running down the tree). Once the climber gets the halo situated he can attach the pipe with the quick connect back on to the halo and secure the pipe to the coconut tree with a 1/2" pipe clamp and two screws. The clamp at the top of the palm can be made tight with duct tape so it will hold the halo in place. Every ten feet or so he can add a 1/2" “D” clamp with screws to secure the pipe loosely down the tree. It needs to be lose so you can push pipe up the tree to allow the halo to be moved to a higher position as the tree grows. The swing pipe resembles a landscape lighting wire conduit once secured to the palm. It is crucial to run the system with water while the climber or lift is up in the tree, to adjust the nozzles (Figure 10). Do not install the halo until you have the entire RC Crown Spray System ready.
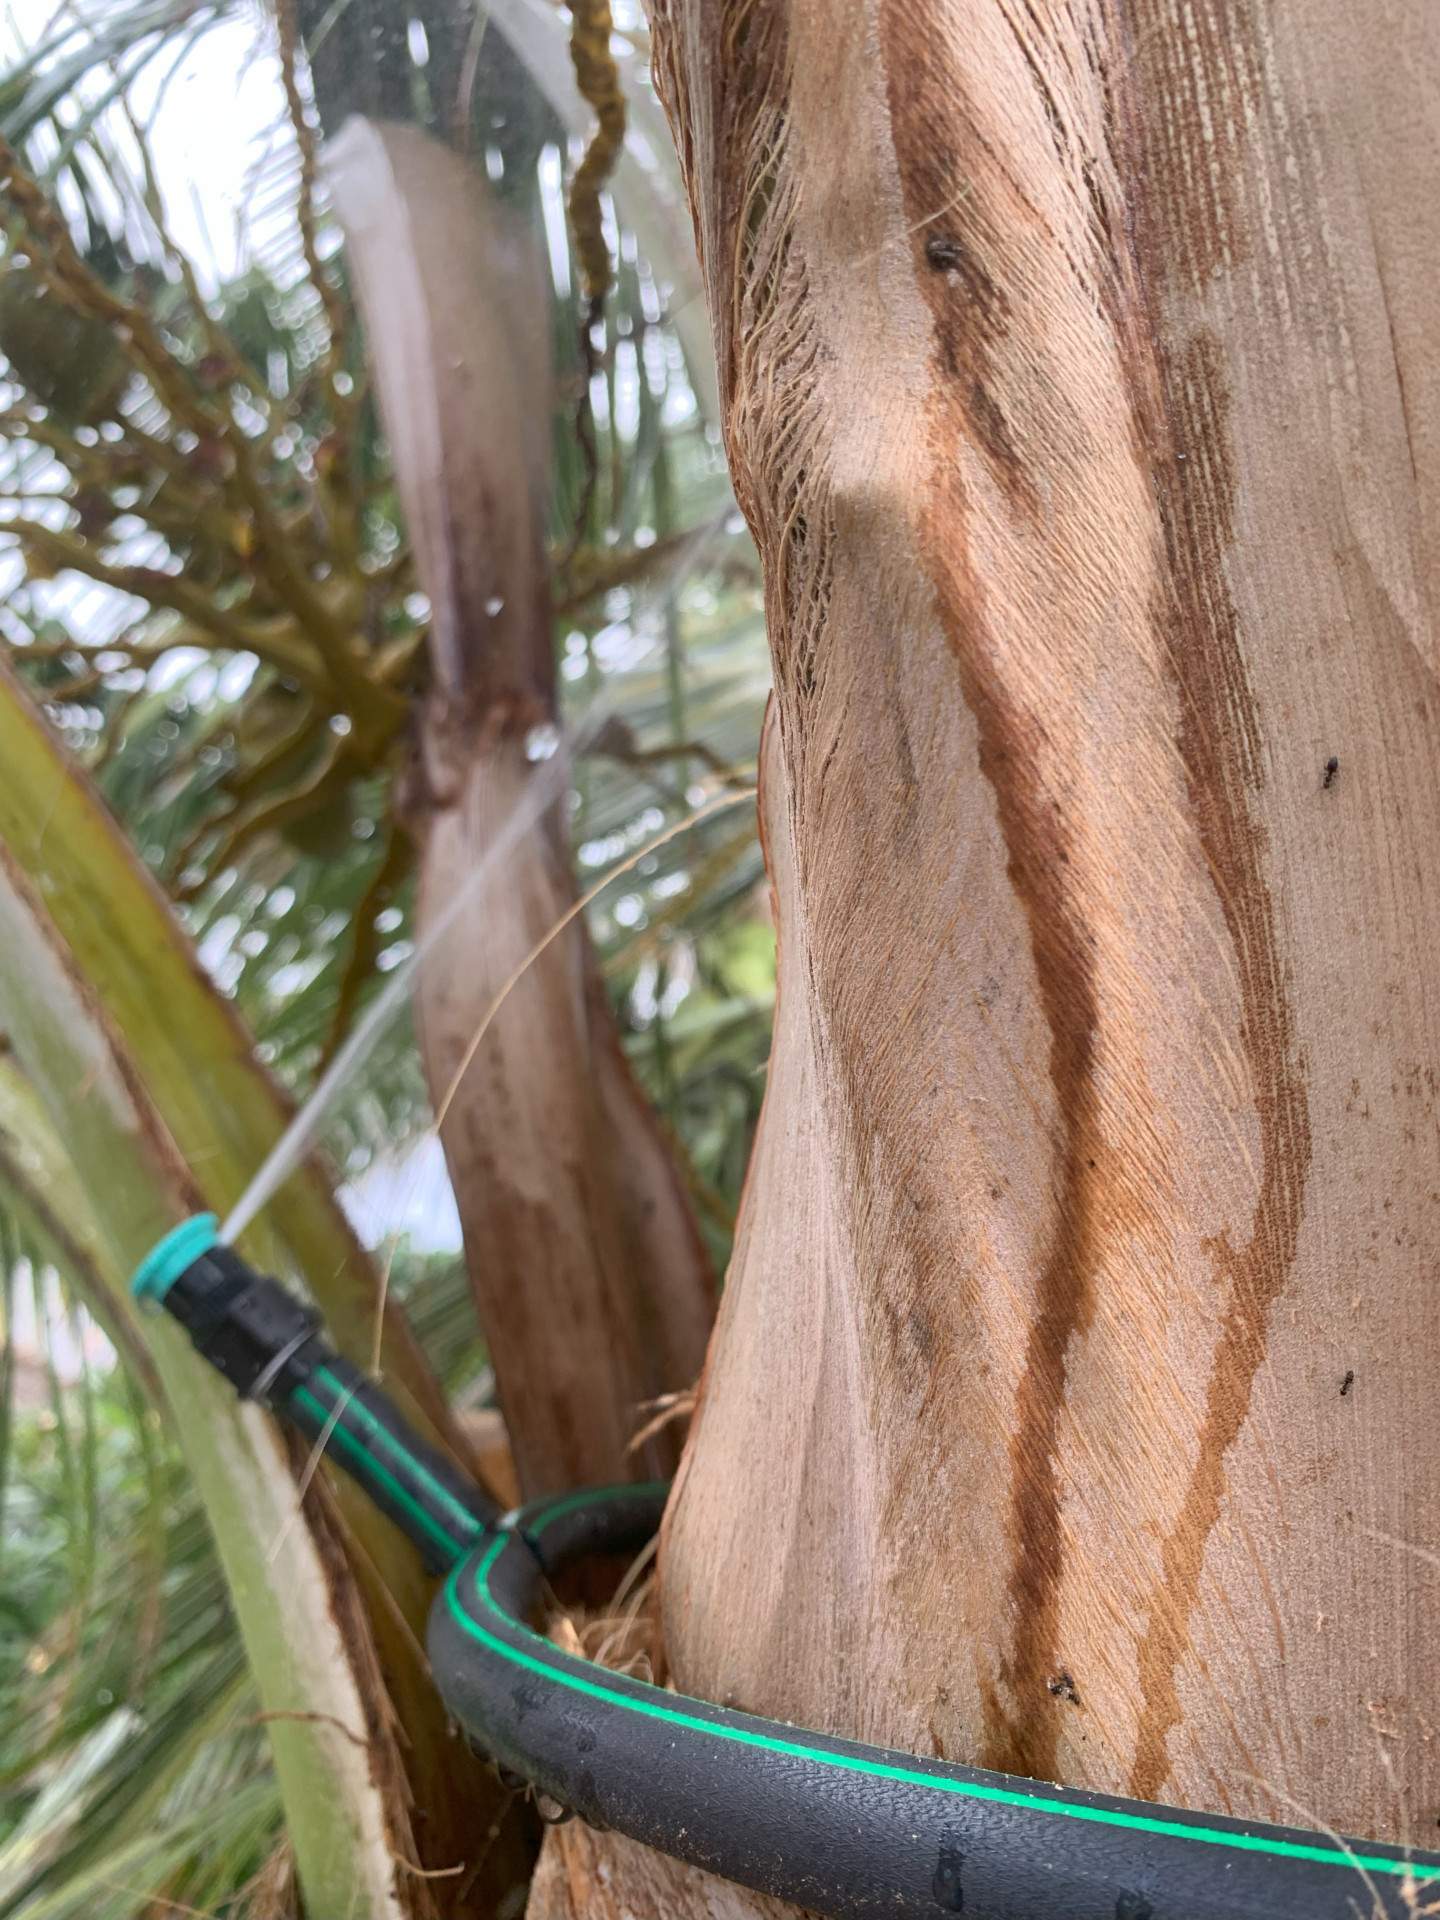
Figure 10. It is crucial to run the system with water while the climber or lift is up in the tree, to adjust the nozzles.
Terminating the hose at the bottom of the coconut tree (Figure 11)
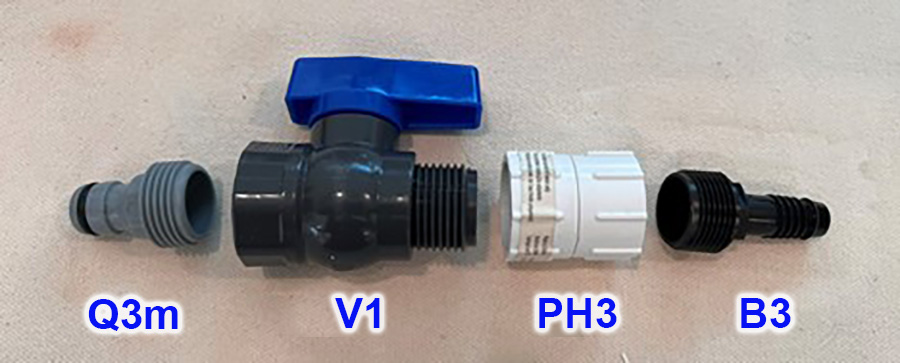
Figure 11. Parts for the hose termination valve left to right.
Parts for the hose termination valve left to right.
Q3m. Male end of a quick coupler (Same as Q1/Q2, $1.20/unit)
V1. 3/4" GHT Heavy Duty Plastic Garden Hose Shut Off Ball Valve Standard Water Shut-Off Ball Valve ($2.50/unit)
PH3. AP-106 .75” x .75” Swivel ADP FIPT x FHT ( Same as PH1/PH2 $3.20/unit)
B3. FPA-075 .75” Funny Pipe Adapter MPT (Same as B1/B2, $0.39/unit)
Assembly of Hose Termination Valve:
19. Screw male end of the quick connect adapter Q3m into the female end of the ball valve V1, making sure the washer is inserted into the ball valve V1.
20. Attach the hose pipe end of V1 to the hose pipe end of the hose to pipe thread adapter PH3, making sure a washer has been inserted.
21. Apply five wraps of Teflon to the barb fitting B3 and screw it on snuggly to the pipe thread end of PH3.
Battery Powered Spray Cart (Figure 12)
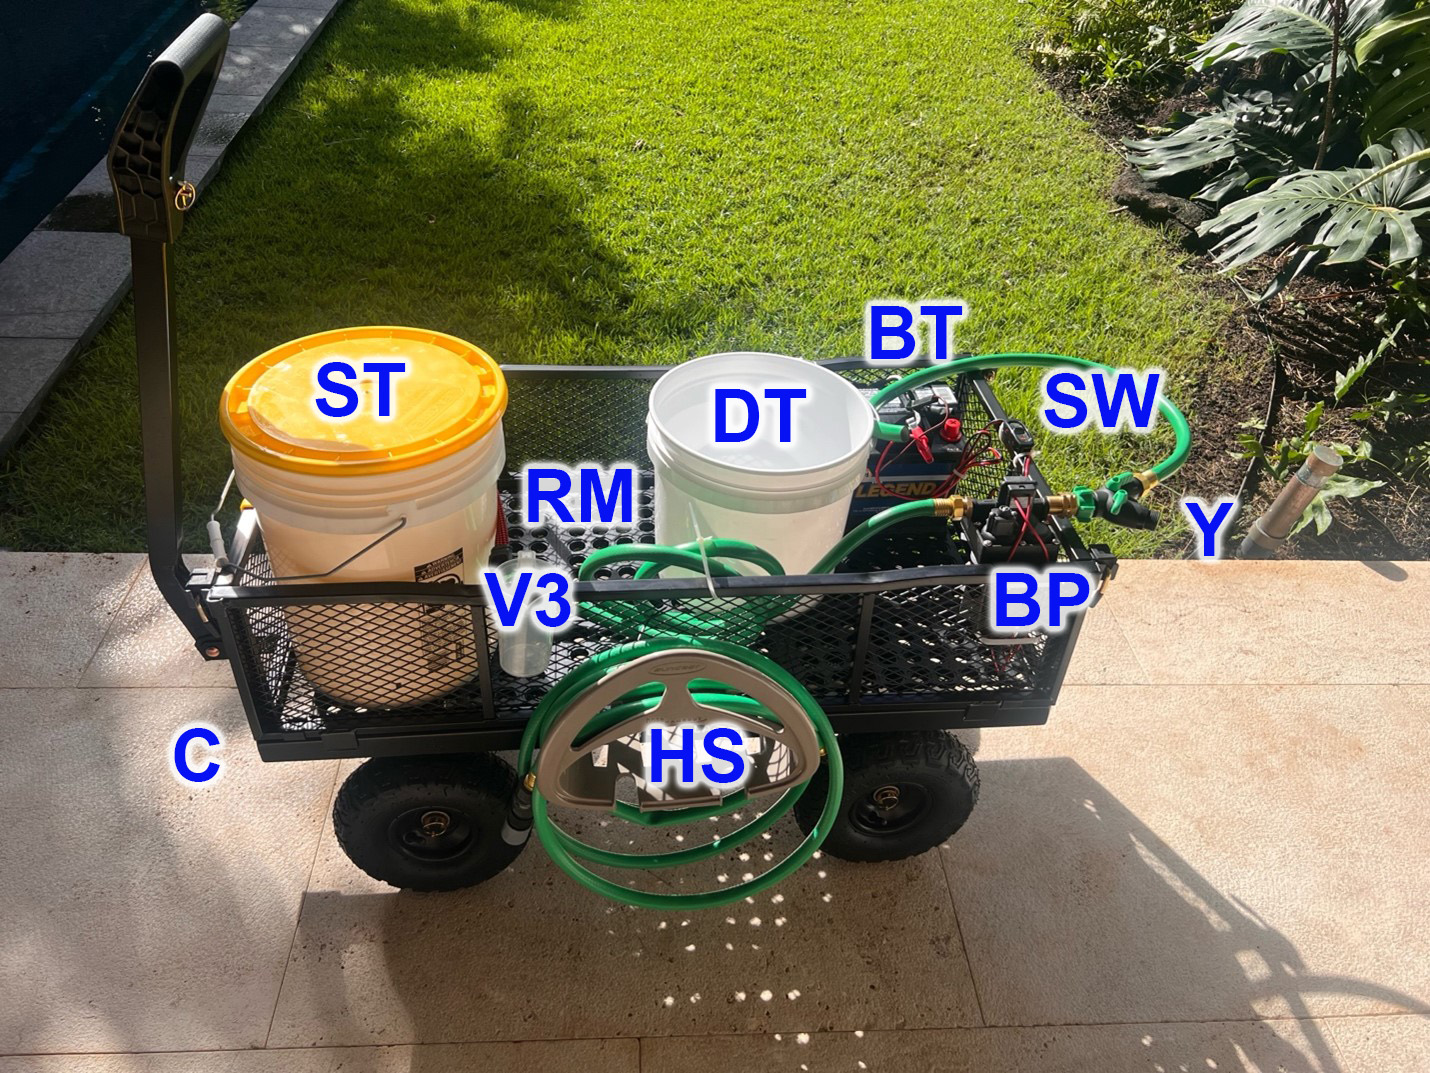
Figure 12. The first DC powered RC System Cart.
The RC Spray Cart is made using the following components:
C. Cart ($149)
RM. Rubber mat ($15 for 1/2 of a matt)
BP. 12 V DC Water Transfer Pump (such as TDRRICH 70PSI $81.65, must size to site needs)
BT. 12V Lead Acid battery (deep discharge, $200)
ST. Spray tank for spray solution, depending on what will be sprayed and label requirements
V3. Plastics Rain Barrel Spigot, High Flow Valve Core, Large Flow Water Tank Faucet, or Plastic Spigot for 5 Gallon Bucket, 3/4 NPS Inlet x 3/4 GHT Outlet Bulkhead Valve for Outdoor Plastic Bucket ($6)
HS. Hose & Reel ($35 and up)
Y. Y Hose Splitter 2 Ways
This is a part of the system that will vary the most depending on the product to be sprayed, type of cart, pump, etc. Larger properties could use a golf cart or a truck instead of the cart C shown in the picture. However, this cart is suitable for smaller or residential properties because it can store all the equipment and supplies necessary for treatments of up to 20 palms. Based on test sprays, 1 gallon of solution can spray approximately 6 (six) palms. Each palm was sprayed 3 (three) times for a period of 5 seconds each time. The multiple sprays is important to allow the solution to be absorbed and "soak in" instead of dripping as run off. The spray solution is stored in the tank ST. The rubber mat RM reduces vibrations from moving the cart and reduces wear of the plastic components and cart surface from rubbing. The valve or spigot V3 controls flows from V1 is important to o open or close the line that connects the tank V1 to the booster pump T. The battery U powers booster pump T and is controlled with a on/off switch not shown in this image. The splitter Y on the output side of the pump U controls the flow and pressure of solution that is sprayed, via hose X, that connects to the quick coupler installed in each (group of) palm. The other side of the emitter controls a small hose that drains the line into a bucket V2 after each (group of) palm is sprayed. The type of tank, the way the line is drained, and the overall concept will vary depending on the product that is sprayed and label requirement.
Pump Hose Termination Valve (Figure 13)
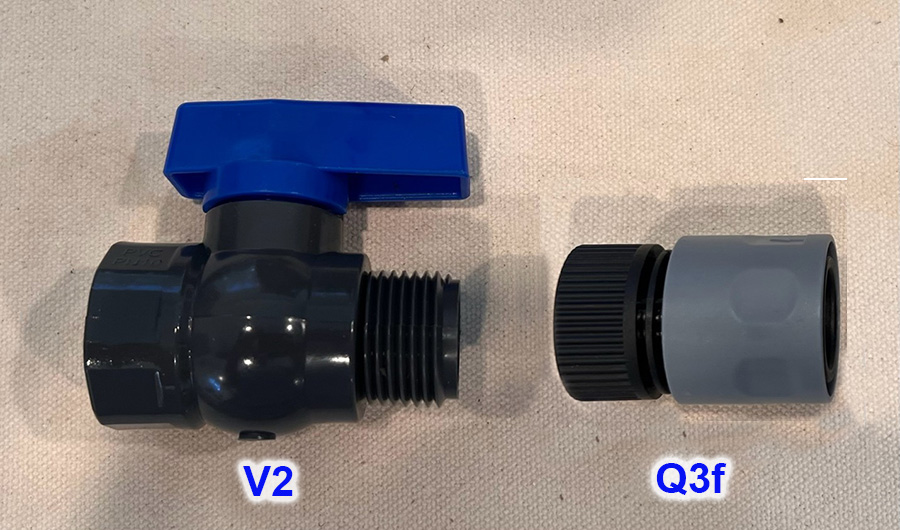
Figure 12. Parts for the Pump Hose Termination Valve.
Parts for the Pump Hose Termination Valve:
V2 3/4" GHT Heavy Duty Plastic Garden Hose Shut Off Ball Valve Standard Water Shut-Off Ball Valve
Q3f Liulo Tool 3/4” Plastic Water Hose Fitting Male and Female
Assembly of the Termination Valve:
22. Attach V2 to the male end of the hose coming from the DC water Pump BP, making sure the washer is in place.
23. Attach the quick coupler female side Q3f to V2 making sure the washer in Q3fis in place.
This assembly will connect to the quick coupler male side at the end of the line running down the (group of) palm with the Halo.
Operation of the system
- Fill the tank with the spray solution, following the label.
- Connect all the lines and open all valves except for the drain valve at the Y. This drain valve should remain closed when the system is spraying and only be opened when draining the lines or releasing pressure from the system.
- Turn the battery switch SW to on.
- With proper PPE, watch the halo and use the valve at the Y to control the flow to the line to the halo to adjust the spray pressure. Turn the system off as soon as spray run off is visible.
- Wait 30 seconds and run the system again for a few seconds.
- Repeat a third time.
- Close V3 at the spray tank ST.
- Ensure that DT appropriate receptable container is in place to receive the solution from the drain line.
- With V1 and V2 open, and V3 closed, open the drain valve at the splitter Y to drain the spray solution from the hose and swing pipe into DT.
- Close all valves.
- Disconnect Q3f
- Connect Q3f to the next (group of) palm or properly store the system until the next spray.
Again, please share your findings and ideas with us!
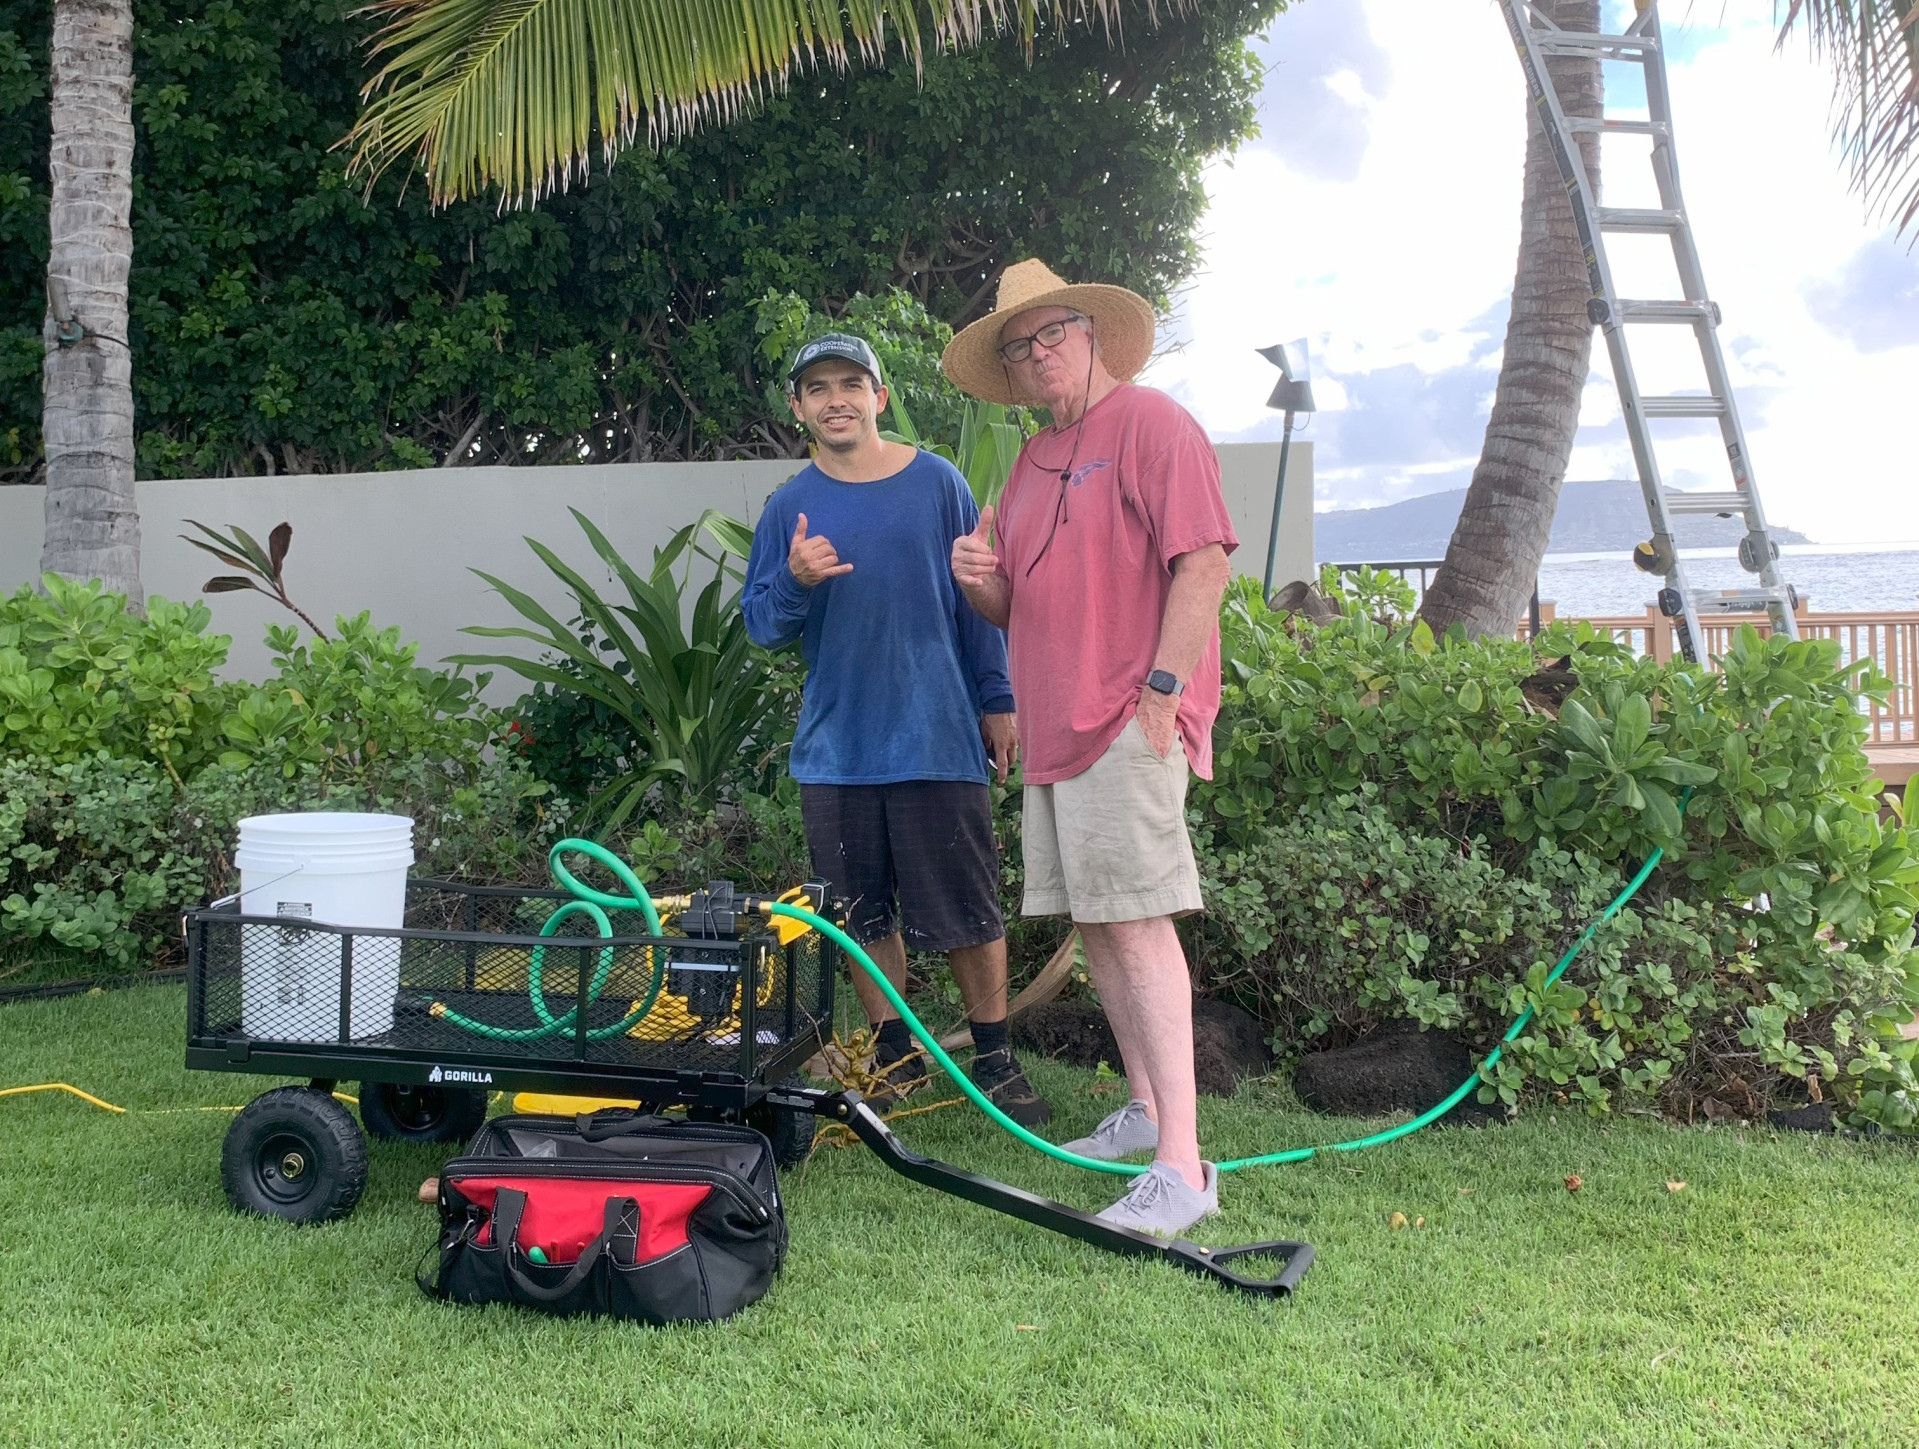
Figure 13. Alberto Ricordi (left) and Brown Cannon (right) testing the first RC Crown Spray System, installed December 2024.
Disclaimer: Read and follow pesticide labels thoroughly. Prior to using a pesticide, make sure the product is labeled for the intended use or specific situations. Refer to county and state regulations regarding pesticide use. Mention of a trademark or proprietary name does not constitute an endorsement, guarantee, or warranty by the University of Hawai‘i, Cooperative Extension, or its employees and does not imply recommendation to the exclusion of other suitable products.
References:
Ravindran, P., Subaharan, K., Venugopal, V., Chandran, K. P., Prathibha, P. S., & Sujithra, M. (2019). Essential oil in management of coconut rhinoceros beetle Oryctes rhinoceros L. In Indian Journal of Entomology (Vol. 81, Issue 3, p. 603).
Ricordi, A. and Cannon, B. RC Halo Spray System walk thru. YouTube, https://youtu.be/Jf-shYUcx1I
Ricordi, A. (2024). Field evaluation of essential oils in preventing damage from Coconut Rhinoceros Beetle in young coconut palms. CTAHR Hana’Ai, Volume 55. https://go.hawaii.edu/hSb
Ricordi, A. and Silva, J. (2024). Preliminary Trials on Use of Essential Oils for IPM of Coconut Rhinoceros Beetle. CTAHR Hana’Ai, Volume 52. https://go.hawaii.edu/bS9
Alberto Ricordi, Ornamental and Landscape Assistant Extension Agent, Department of Tropical Plant and Soil Sciences, Cooperative Extension, Oahu County, CTAHR, University of Hawaii at Manoa. [email protected]
Brown Cannon, Graduated from the University of Arizona in 1968 with a Bachelor of Science in Agriculture and has been actively involved in Agriculture for 60 years. http://savehawaiianpalms.com/
Festive Plants for the Holidays

By: Jessica Higashi and Tina Lau
The Oʻahu Master Gardener Program held its annual holiday gathering on December 18 for volunteers who got creative, making wreaths, swags, and table runners with foliage from the Urban Garden Center (UGC). Long-time volunteers Bea Sailer and Merlinda Oania gathered foliage from plants that can be grown in a home garden: juniper, pine, parsley panax (Polyscias fructicosa), mgambo, lipstick tree, song of India, ʻākia, grandleaf seagrape, Ficus umbellata, lavender, and more (Figures 1 and 2)! Many plants can add colorful accents to your special holiday decoration!
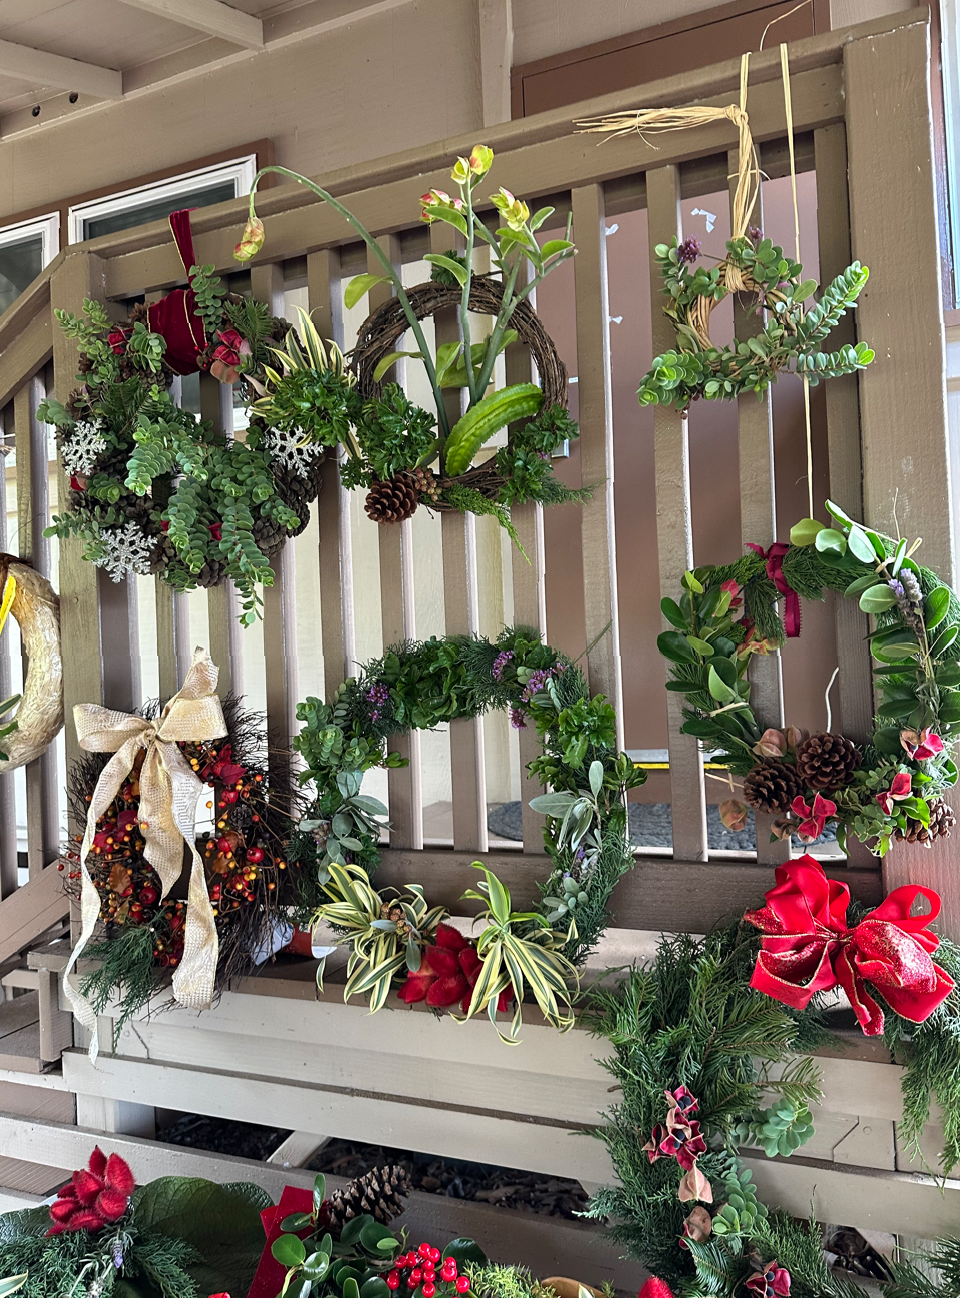
Figure 1. Wreaths created by UGC volunteers (Photograph credit: Dana Anne Yee, FASLA)
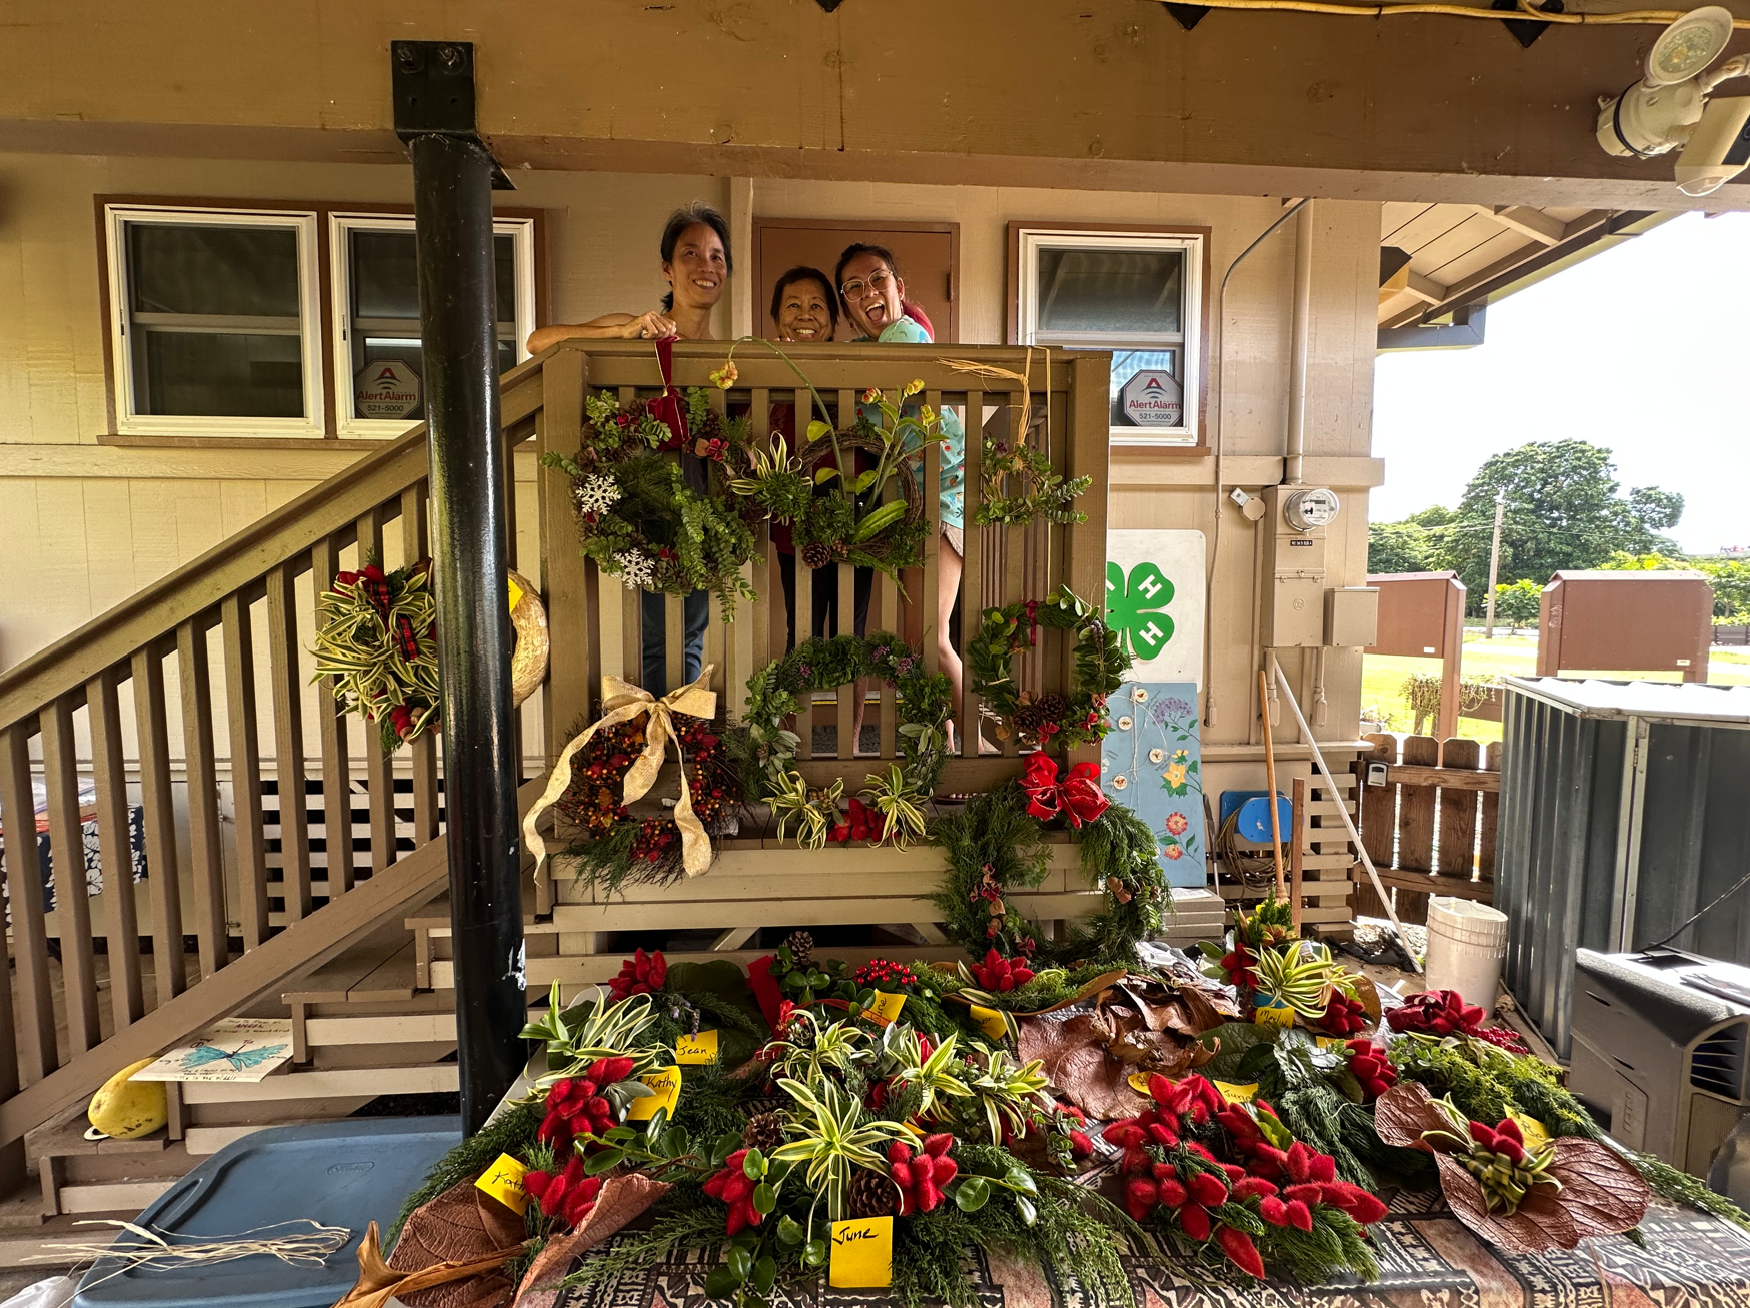
Figure 2. (right to left) Jessica Higashi, Bea Sailer, and Tina Lau above the assortment of wreaths and table runners created with plant materials from the gardens. (Photograph credit: Dana Anne Yee, FASLA)
Junipers are evergreen trees adapted to tolerate heat and drought, such that the trees survive at low elevations without irrigation. The needle-like leaves provide contrasting texture to broadleaf shrubs or trees, making it visually appealing in a landscaped garden.
To complement the rough textured juniper, plant a magambo or black pearl tree (Majidea zanguebarica) that has glossy green compound leaves. Its most attractive feature is the 3-sided fruit capsule that opens at maturity to reveal a bright red lining and a purplish black seeds (Figure 3). The tree can grow to 80 feet in height so annual pruning is recommended.

Figure 3. Caption: Fruit from the mgambo, or black pearl tree.
The lipstick tree (Bixa orellana) flushes with softly spiny red fruit under direct sunlight (Figure 4). The bush-like small tree is easy to care for and can be grown from seed or cuttings. The bright red seeds are crushed to produce an orange-red dye called annatto which is used for cooking and coloring fabric (Figure 5).
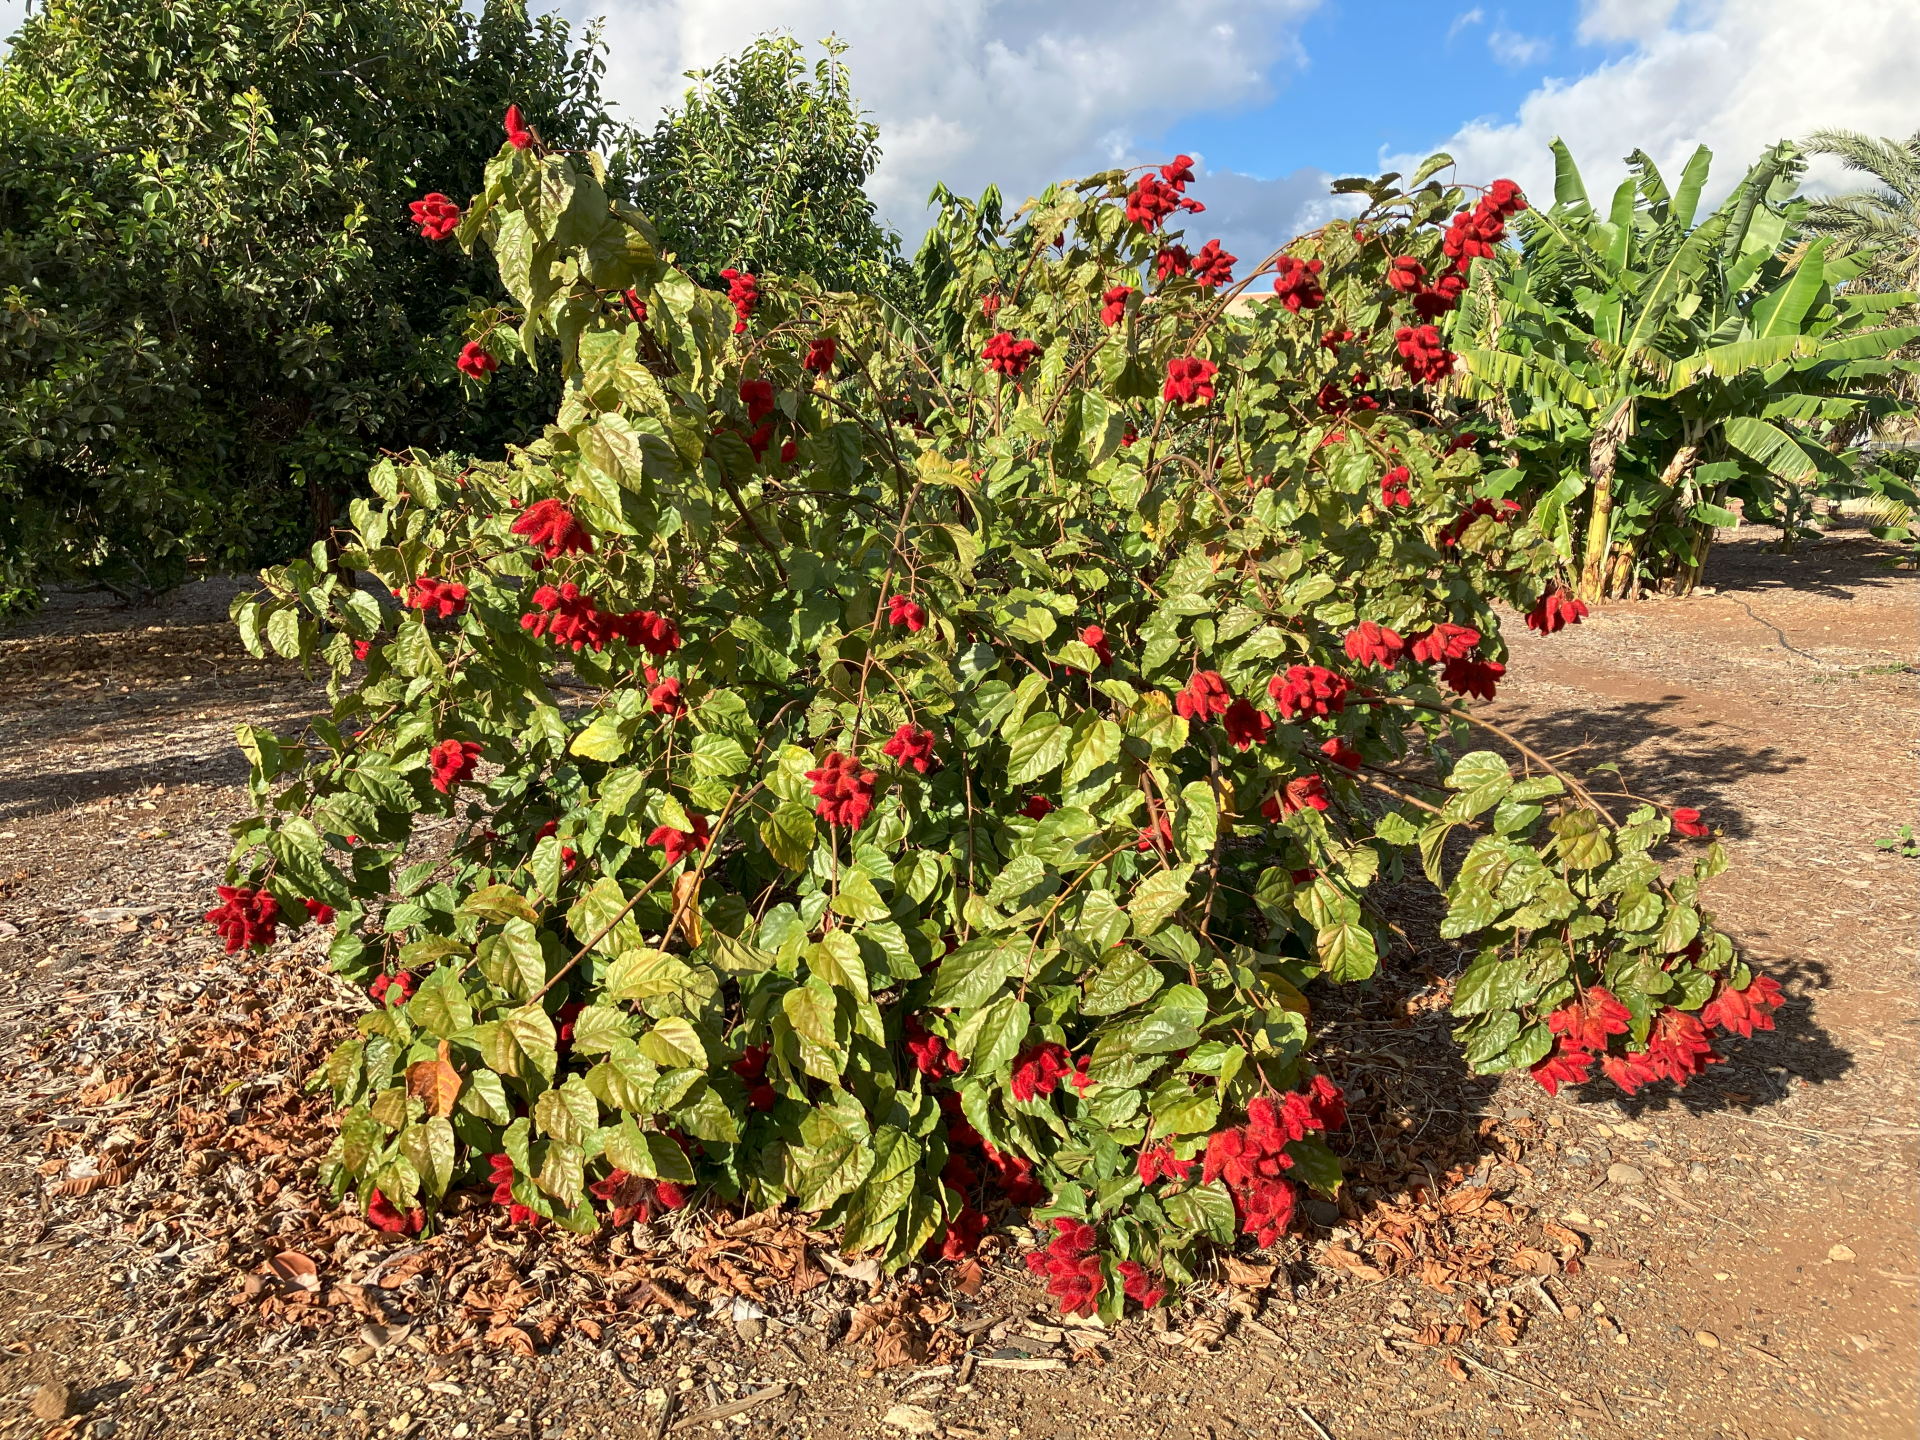
Figure 4. Lipstick tree 1. Caption: Lipstick tree
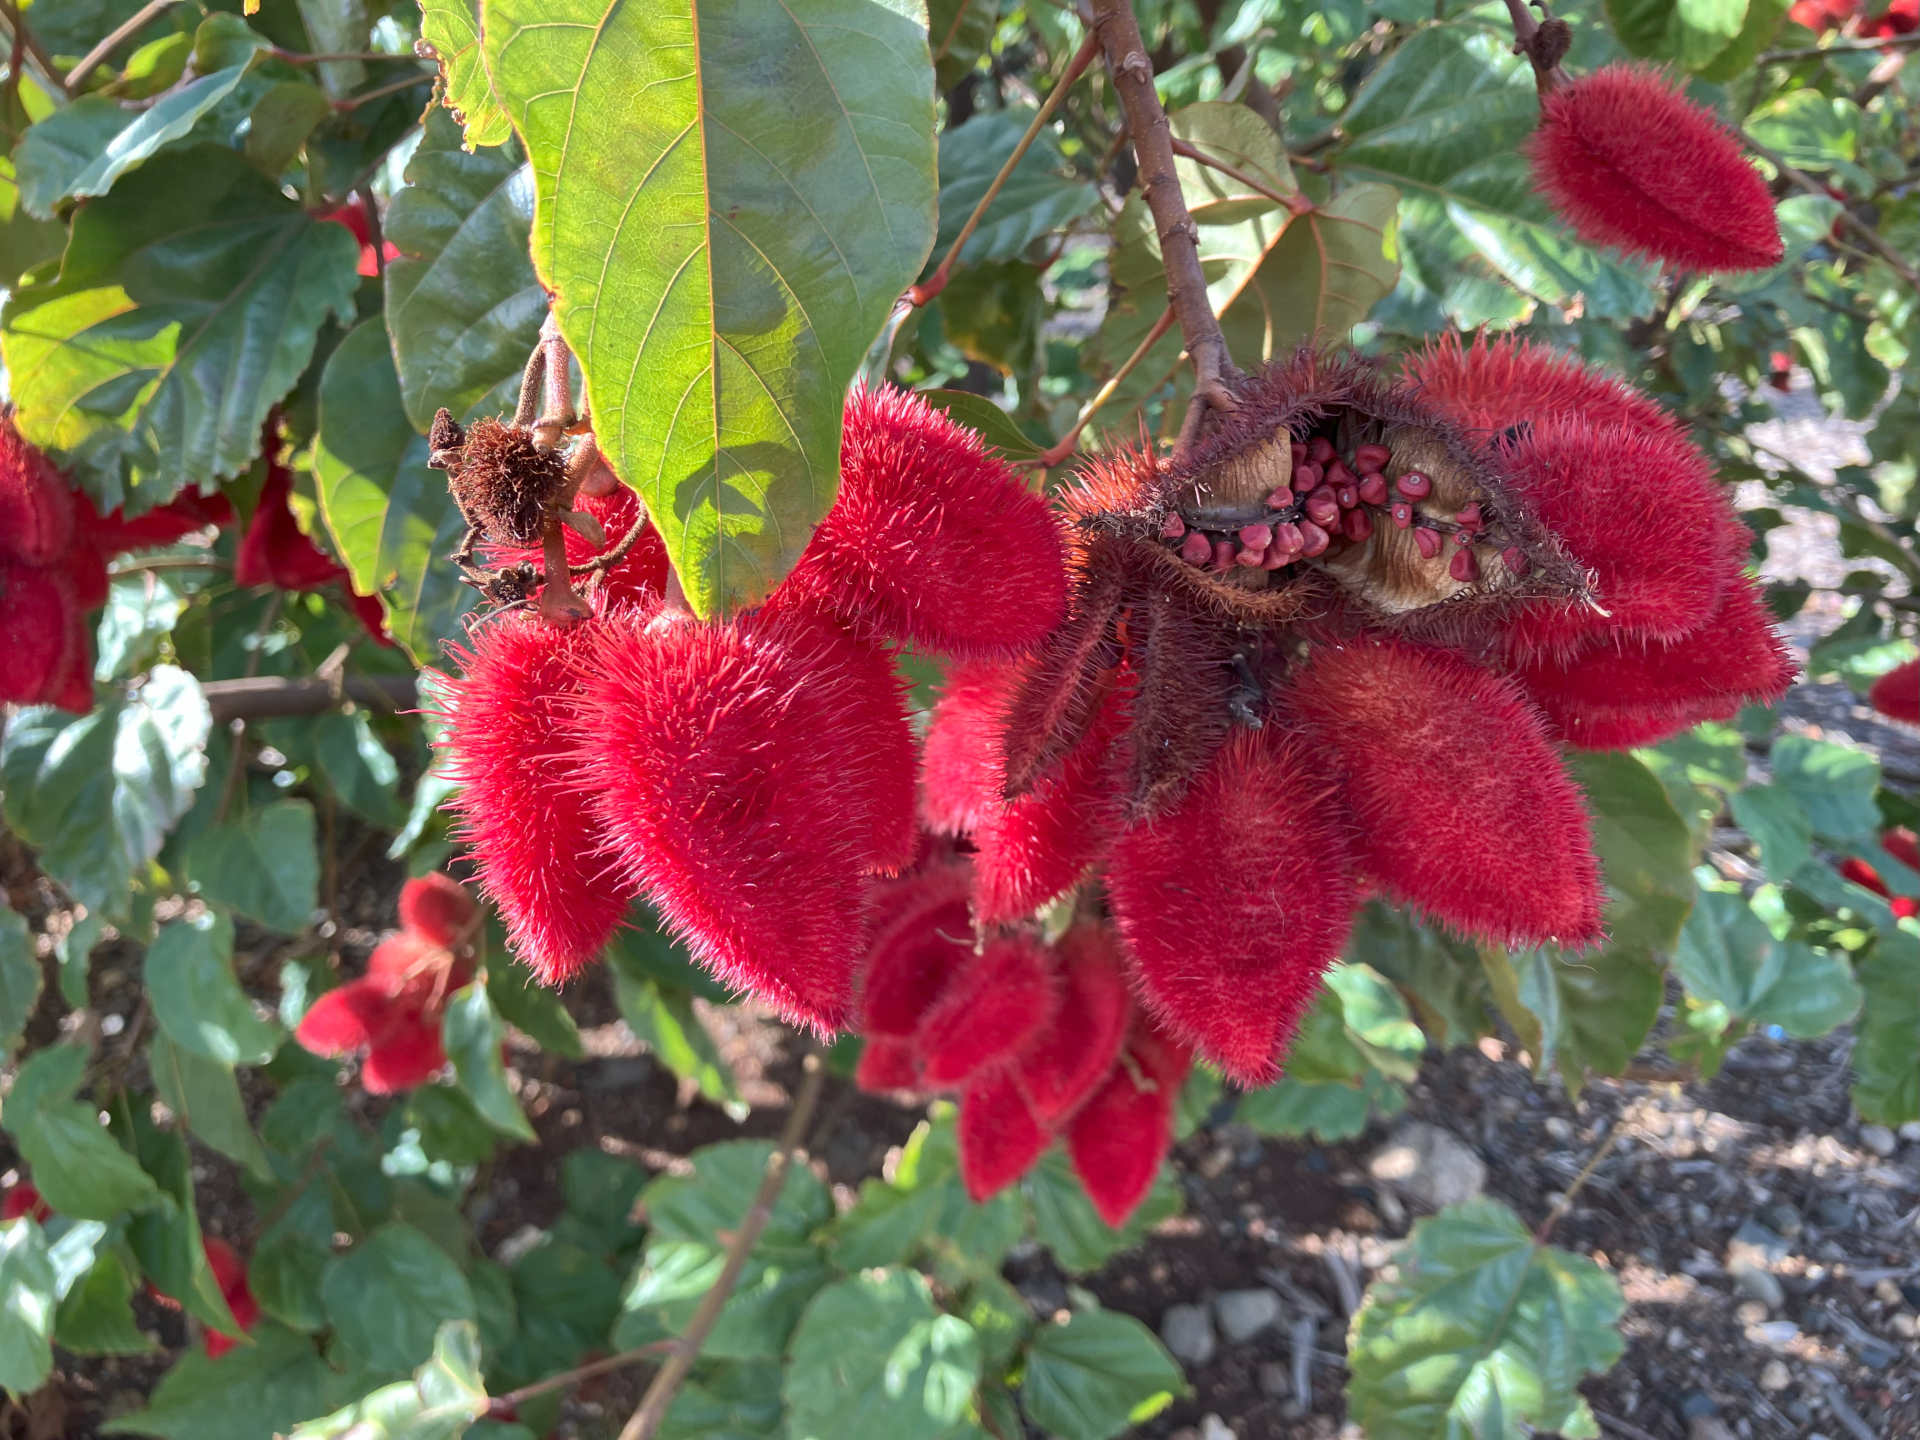
Figure 5. Lipstick tree 2. Caption: Red fruit of the lipstick tree contains seeds used as a dye.
Song of India (Dracaena reflexa) grows tall and the leaves have creamy white leaf borders that enhance the green midrib. It is easily grown from branch cuttings and the leaves can be used in decorations ranging from wreaths to lei.
ʻĀkia (Wikstroemia uva-ursi) is a Hawaiian endemic shrub with delicate yellow flowers interspersed between symmetrically arranged oval leaves. The flowers turn into red drupes containing a single seed that is easy to propagate when freshly harvested (Figure 6). The low growing sprawling shrub acts as a ground cover that beautifies the landscape and deters weed growth.
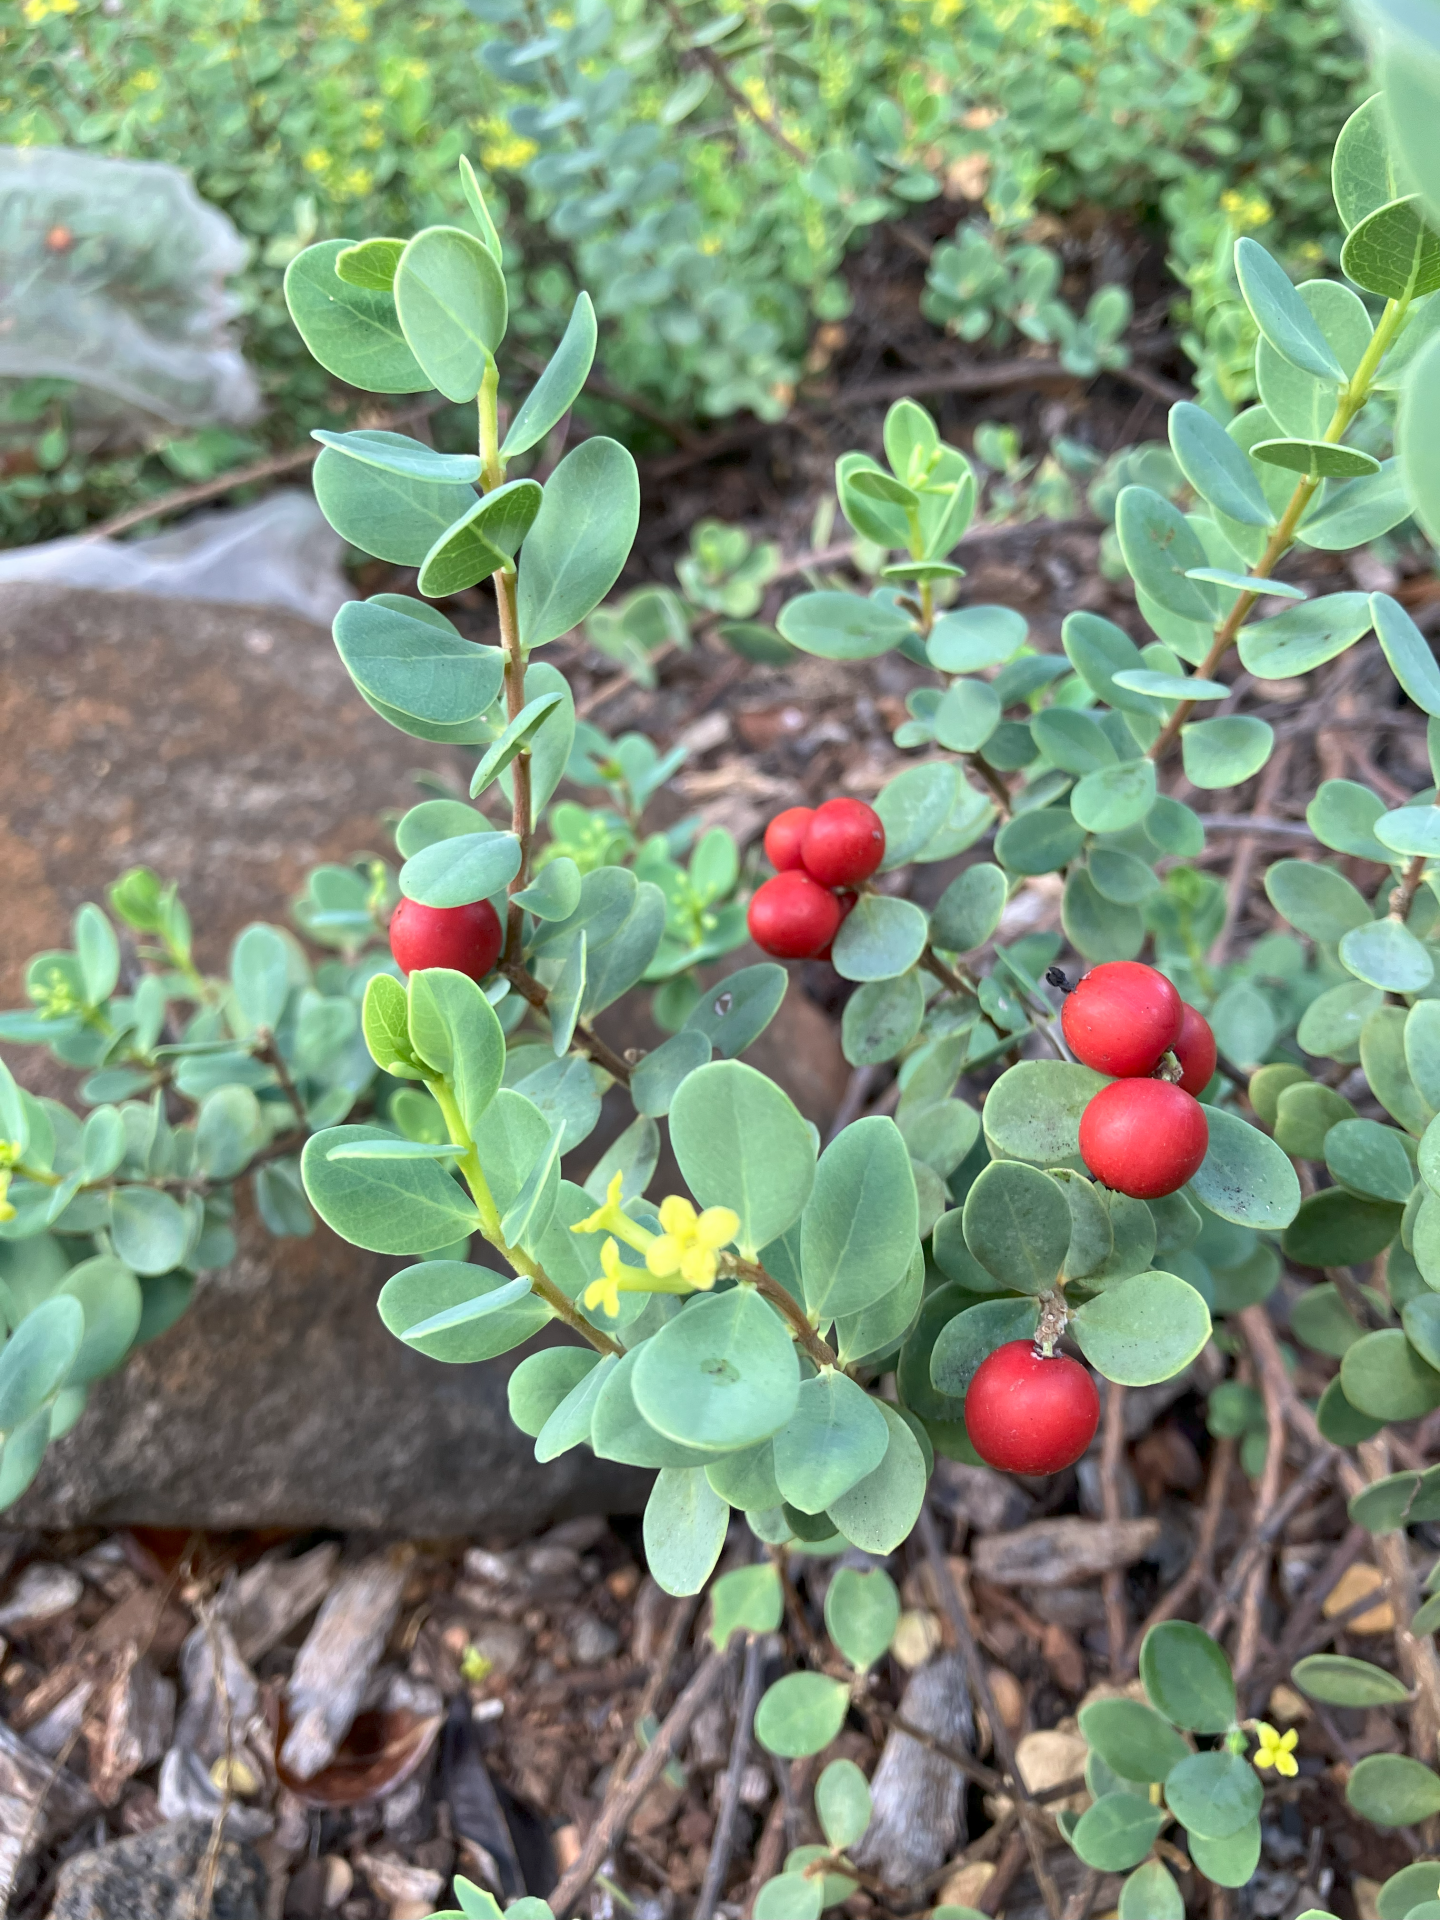
Figure 6. The yellow flowers and red drupe of ʻākia
The grandleaf seagrape tree (Coccoloba pubescens), also known as the leathercoat tree, grows to 80 feet tall and sheds large oval leaves that remain pliable as backing for table decorations (Figure 7). The light green fruit hang like grape clusters from the branches and provide eye catching focal points in the canopy.
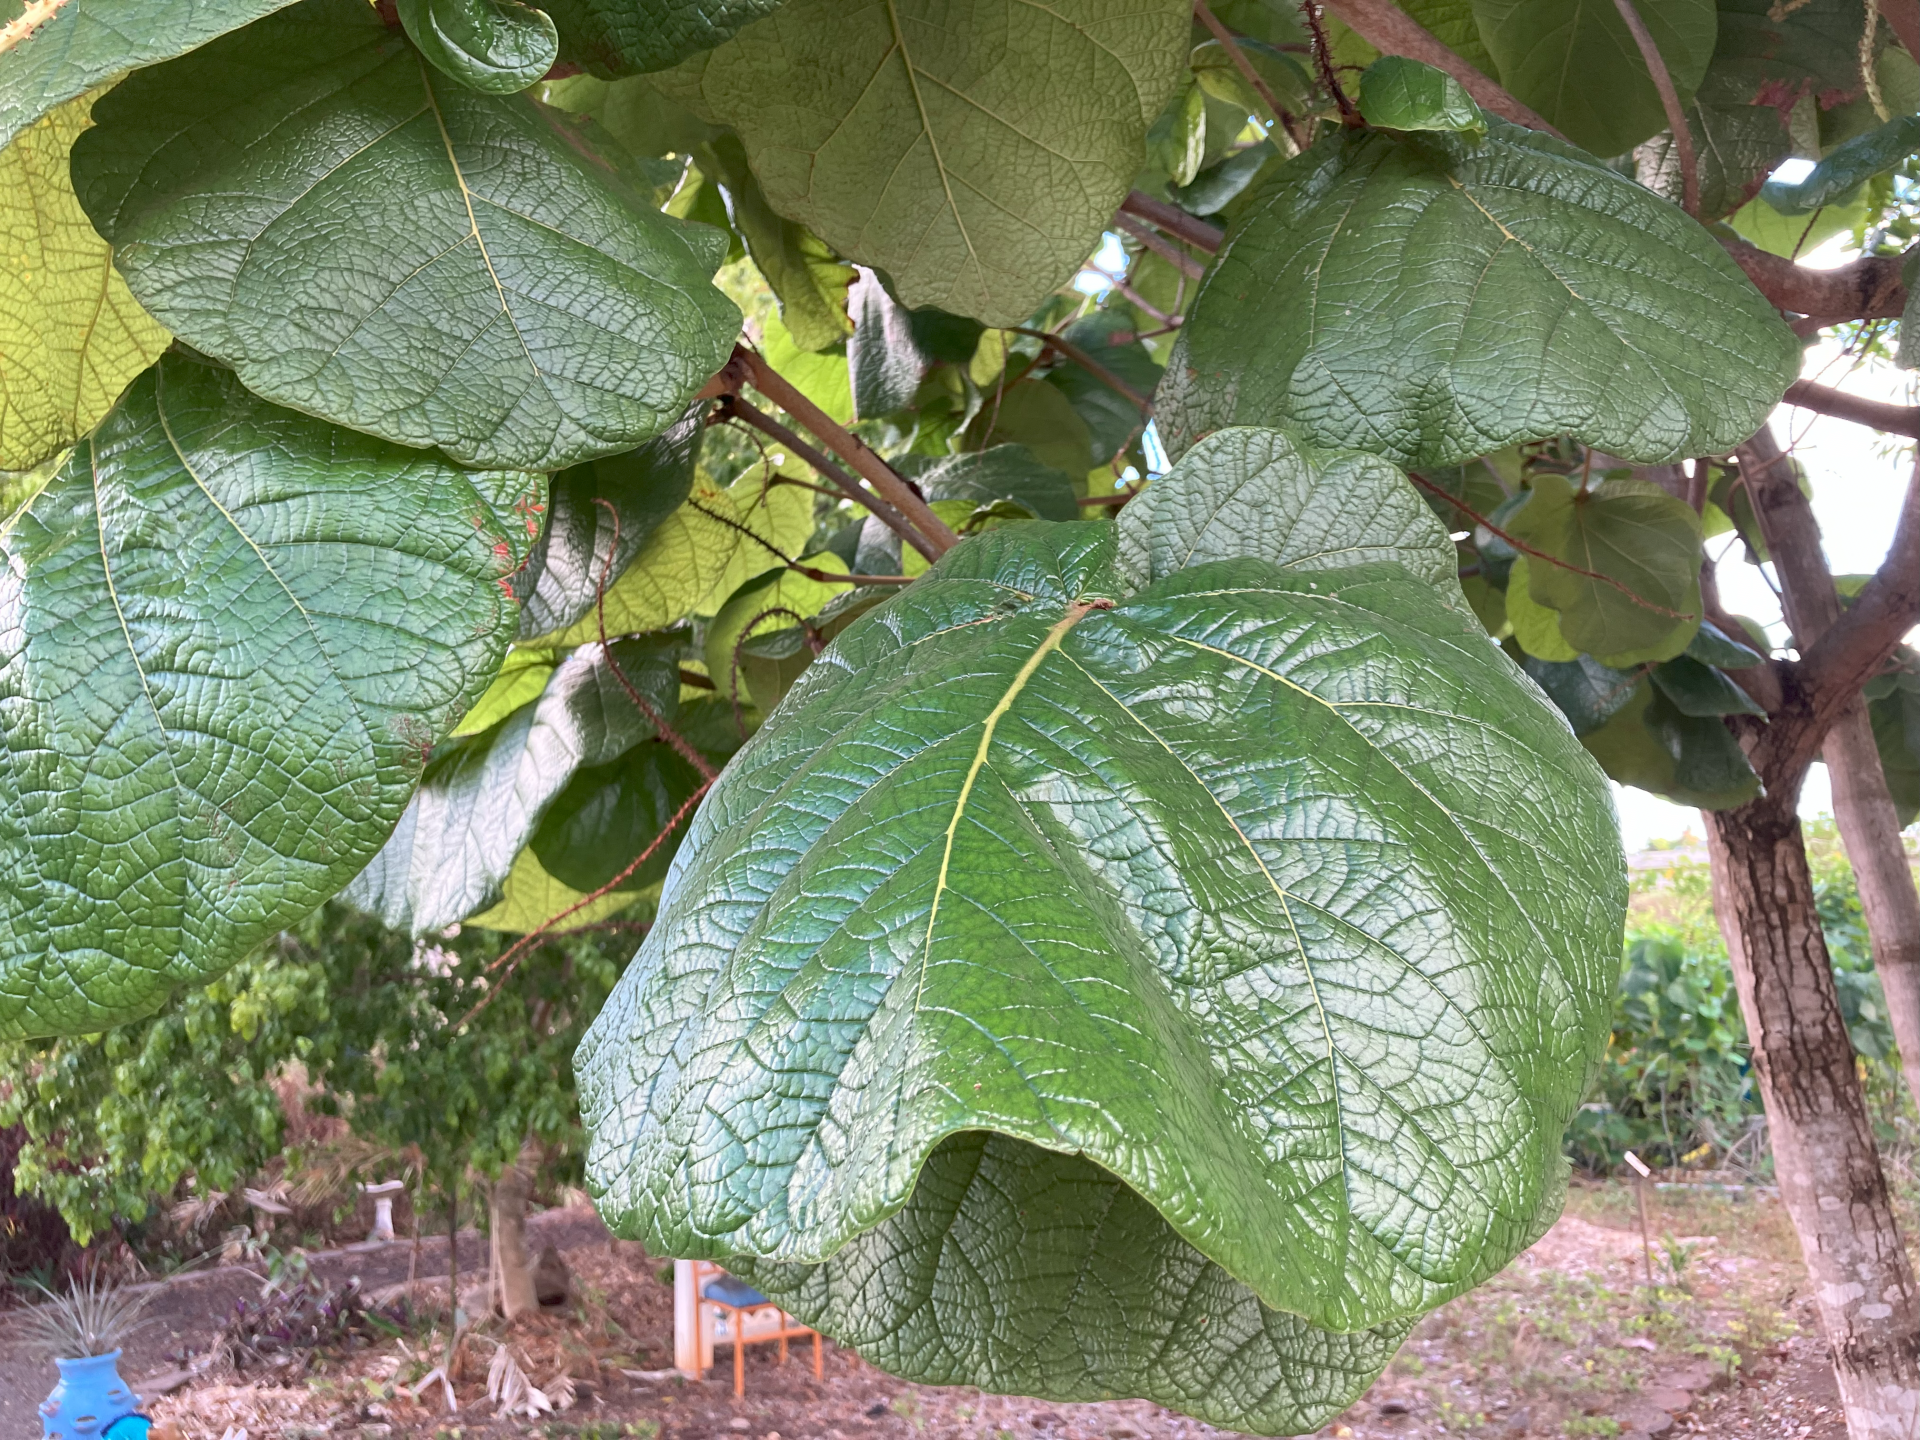
Figure 7. The grandleaf seagrape, or leathercoat tree leaf is used in decorations after it has dried.
Jessica Higashi, Academic Support/Program Specialist, College of Tropical Agriculture and Human Resilience
Tina Lau, Jr. Extension Agent, College of Tropical Agriculture and Human Resilience
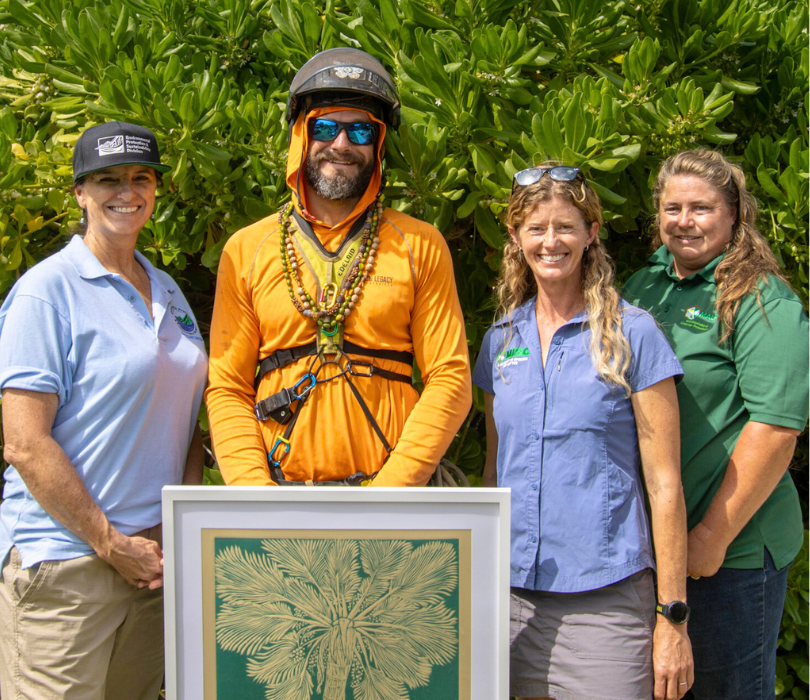
Jake Kane Receives AAA's 2024 Annual Award

By: Maui Invasive Species Committee (MISC) and posted by Serene G. This article is a reprint of the original posting available here with permission from MISC.
Jake Kane of Kane’s Legacy Tree Services was the recipient of the 2024 Mālama i ka ‘Āina Award, presented at the Arbor Day Expo at the Maui Nui Botanical Garden on November 2, 2024. Now in its 22nd year, the Mālama i ka ‘Āina Award is given annually to recognize individuals in the landscape and agricultural community working to stop the spread of invasive species. The award is presented by the Maui Invasive Species Committee, the Maui Association of Landscape Professionals, and the County of Maui.
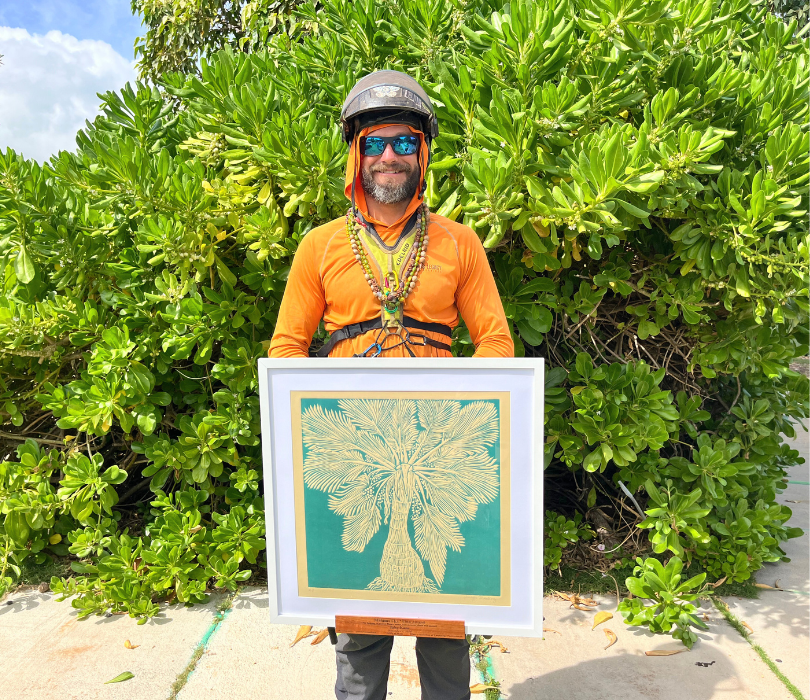
Kane is widely recognized in Maui’s landscape community for his professionalism and commitment to environmental health. His work promotes a balanced approach to vegetation management – underscoring the importance of removing invasive trees while maintaining a healthy tree cover. Kane’s methods promote safety, environmental health, and climate resilience in Maui County, and have significantly influenced local land use strategies. Beyond his business, Kane is actively involved in community outreach, sharing information on tree management for safety and fire prevention.
Last summer, during the August 8 wildfires, Kane lost his entire inventory of vehicles and equipment. Despite these setbacks, he was among the first arborists to return to Lāhainā’s burn zone to assess hazardous trees and educate the public on managing – rather than removing – fire-affected trees. Kane’s expertise post-wildfire proved essential to ongoing recovery efforts, underscoring his commitment to Maui’s resilience.
More recently, Kane and his team assisted the County of Maui in a massive clean-up effort near Ukumehame, where a former wetland area was covered in invasive species and littered with trash and derelict cars. Kane and his team felled acres of invasive trees, leaving culturally significant canoe and native trees. The County’s Environmental Management team later praised his professionalism and collaboration, calling Kane and his team the “most professional” they had ever worked with.
Kane’s legacy of collaboration extends over a decade. In 2012, he was instrumental in assisting with a West Maui little fire ant infestation, helping the Maui Invasive Species Committee tackle the challenge of ant nests in the tops of coconut palms. His collaborative problem solving allowed local teams to treat infestations independently. Kane has also been proactive in taking preventative measures against emerging threats like the coconut rhinoceros beetle. His motivated approach to conservation embodies the spirit of mālama ‘āina.
This year’s award is a linocut print of a native loulu palm by Maui artist Jennifer Thackray. The original piece was featured in the 2024 Mālama Wao Akua exhibit at the Hui No’eau Visual Arts Center.
The 2024 Malama i ka ‘Aina Award acknowledges Jake Kane’s invaluable role in promoting environmental stewardship and community resilience on Maui, setting a powerful example for sustainable land management in Hawai‘i.
Community News
 Congratulations to the newly elected Board of Directors. The board will serve a one-year term through December 2025.
- Brandon Au
- Matt Culver
- Larry Borgatti
- David Golden
- Matt Lyum
- Brad Tanimura
- Allison Wright
For the complete listing of the board and ex-officio officers with designations and positions, visit our website: LICH - Board of Directors
